Tampilkan postingan dengan label pure maple syrup. Tampilkan semua postingan

Minggu, 06 Oktober 2013

Quick & Easy Pancakes - 3 Ways


Someone mentioned to me the other day that they love my Blender Batter Pancakes recipe, but that sometimes they're in too much of a rush to do the whole 'prepare the night before' thing, and they needed a simple pancake recipe for times like that. I agree - I don't always soak the grains the night before, because pancakes are sometimes a spur of the moment thing. Like last night.

We arrived home from our road trip to Mackay in the afternoon, and I managed to scrounge through the fridge and freezer to find mince and veges for a quick dinner. But by 8pm I was hungry again. That's when it dawned on me that while I was away my mum had stocked up the big freezer with half a pig (homegrown by a friend and butchered locally). AND I had just bought a litre of organic pure maple syrup from Sprout in Townsville. Perfect. Pancakes, bacon and maple syrup, coming up! (Yes, I know, soup for breakfast and pancakes for supper... I'm weird like that.)


I used to work at a roadside cafe for a Canadian lady when I was 18, and she found it very strange that I didn't know how to make pancakes just off the top of my head. It made her quite impatient when I'd ask her 'How much flour was that again? How much milk?' So I soon learnt, and nowadays I don't usually measure, just chuck in a bit of this and a bit of that until they look right. But just in case you are like my 18 year old self and need a recipe, I've written out the measurements for you. Feel free to tweak to taste - more milk for thinner pancakes, less milk for thicker. And I've added a few variations, so you can pick between spelt, gluten free and grain free coconut flour pancakes. If you need an egg free or nut free variation, check out the notes below the recipes.

Enjoy!


Quick & Easy Pancakes

250g spelt flour (white and/or wholemeal) or 220g plain gluten free flour
2 tsp baking powder
1/4 tsp fine sea salt
300g rice-almond milk or coconut milk (or alter amount depending on preferred thickness)
30g macadamia oil or soft butter
1 tsp vanilla extract
1 egg (optional - see notes)
coconut oil for cooking pancakes

Place dry ingredients into mixing bowl and blend 5 sec/speed 5.

Add remaining ingredients (except oil for cooking) and blend 10 sec/speed 5.

Heat a heavy based frying pan over medium-high heat and add 1-2 Tbsp coconut oil. Once it melts, pour in 10cm circles of pancake batter, and turn heat down slightly to make sure the pancakes don't burn.

Cook until bubbles are forming and popping in the batter, and edges are becoming crisp. Turn over and cook until lightly browned.

Remove pancakes to a plate, add another 1-2 Tbsp coconut oil, and continue cooking pancakes until batter is finished.

Serve hot with butter (opt) and pure maple syrup, or sprinkled with Rapadura or coconut sugar and freshly squeezed lemon juice. Leftover pancakes can be stored in an airtight container for up to 2 days and served with jam as pikelet, or reheated under the grill.

This batter also works well for waffles.

Notes:

To make these egg free you can use egg replacer, or chia eggs (1 Tbsp chia seeds + 3 Tbsp water), or half a mashed banana, or just add a little extra milk.

For nut free, use olive oil, coconut oil or butter, and coconut milk instead of rice almond milk.


Coconut Flour Pancakes

5 eggs
170g almond milk or coconut milk
70g coconut flour
30g macadamia oil
1/2 tsp vanilla extract
1/8 tsp fine sea salt
2 tsp baking powder

Place all the ingredients into the mixing bowl and blend 10 sec/speed 6. Scrape down sides of bowl and reblend briefly on speed 3 if needed.

Cook as above.

Notes:

To make almond milk, just mill 100g raw almonds 10 sec/speed 9, add 500g water and blend 
1 min/speed 9. No need to strain the milk for this recipe.

Coconut flour really needs the eggs to work, although maybe banana would work instead. 
I haven't tried that yet - let me know if you do!

For nut free, use soft butter or coconut oil instead of the macadamia oil, and coconut milk instead of almond milk.

Selasa, 10 September 2013

Coconut Vanilla Sorbet


Spring is here, and the weather is finally beginning to warm up, yippee! At least, it is here, up in the mountains in Far North Queensland. 

For the last couple of months I've been putting off testing ice cream recipes for my book, as it's just been too cold. But today was absolutely gorgeous, and the sunshine encouraged me to get started. I decided to begin with a coconut sorbet, and it turned out so delicious I just couldn't wait to share it. (Don't worry, I have way too many recipes to fit in my book anyway, so I can afford to pop one on the blog instead.) :)


Photo taken this evening on our street ~ Spring is here!

I got the idea for this recipe a few weeks ago, when I saw a coconut sorbet in the freezer section of the grocery store. The ingredients were: coconut water (60%), cane sugar, coconut cream and flavour, desiccated coconut, dextrose, natural stabilizers (xanthan, guar gum, carrageen, maltodextrine). I figured I could make my own with less ingredients, no highly processed sugar, no flavours, and no carrageen. For less money. So that was my challenge... I hope you'll let me know what you think of the outcome! I haven't actually tasted the one from the grocery store so I have no idea if mine is the same sort of flavour, but I love this one and am very happy knowing it's healthier and costs less.

This sorbet actually took me right back to my childhood, when mum would make ice cream for us from fresh snow. Have you ever eaten 'snow ice cream'? When I was 4-5, we were travelling around the USA in a camper van for a year. When it snowed we would go outside and scoop up the clean snow, take it back into our warm camper van, and Mum would mix in some sugar and vanilla. We thought it was the most amazing treat ever. It's funny, I haven't thought about snow ice cream for years, but with my first mouthful of this sorbet, that's all I could think of! So I popped some into a bowl and dashed down to mum's house to give her a taste, and mum and dad agreed - just like snow ice cream. Great memories.

I hope you enjoy it as much as we did. 


Coconut Vanilla Sorbet
(dairy, egg, nut, gluten, and cane sugar free)

Makes just under a litre.

800ml unsweetened coconut water (eg. Natural Raw C coconut water)
100g thick coconut cream, preservative free (eg. Ayam)
60-80g pure organic maple syrup
1/2 - 1 tsp pure vanilla extract or vanilla bean paste (to taste)
dessicated coconut to serve (preservative free, available at health food shops) OR fresh coconut, grated

Freeze the coconut water in ice cube trays until frozen solid.

Place 400g of the coconut water ice cubes into the Thermomix mixing bowl, and blend
5 sec/speed 9, or until it becomes 'snow'.

Add remaining 400g frozen coconut water and blend 10 sec/speed 9, until 'snow'.

Add coconut cream (the thickest part from top of tin), maple syrup and vanilla, and blend 
1 min/speed 9, using the spatula to help it along. Remove lid and scrape down sides, reblending until sorbet is smooth and creamy, approx. 30 sec/speed 9.

Serve immediately, sprinkled with a little dessicated coconut.

Note: If you need to freeze some for later, freeze in ice cube trays and reblend when ready to serve.

Variations:

If you have fresh coconuts on hand, freeze the coconut water, and grate up the flesh to make coconut cream (see this recipe for instructions), saving a little of the freshly grated coconut to sprinkle over the finished sorbet. Delicious! (And dirt cheap!) 

Sweetener can be reduced to taste, or changed to a 1/4 tsp green stevia powder for a sugar free version.


Jumat, 21 Juni 2013

Dairy Free Condensed Milk & Dulce de Leche


The other day I asked on my Facebook page, "What's something you reeeeaaallly wish you had an allergy-friendly recipe for (and what's the ingredient/s that is stopping you make the original recipe)?" Well. I got lots of comments. Like about 180 of them. And one that was mentioned a few times was dairy free condensed milk, so I thought it was about time I had a go at it.

There are a few dairy free condensed milk recipes online - I had a quick look for Thermomix versions and found this one over at The Thermomix Diaries, which linked back to this one on the Thermomix Recipe Community. Of course, I had to have a play with the recipe to reduce the sugar (too much for me!), change it to a sweetener I prefer, and start with a creamier (dairy free) base instead of milk. And this is what I came up with... So delicious!! 

I've made it a few times now, each time a little different, so here's two different versions - one is just a basic dairy free condensed milk made with bought coconut cream, and the other is a dairy free dulce de leche (caramel) made from homemade coconut cream, inspired by this recipe over at the UK Thermomix FB page. I'm thinking you could use the dulce de leche recipe and just cook it for less time to make a 'from scratch' version of the condensed milk - that will be my next experiment! (Thought I'd better just hurry up and get this posted!!) 

By the way, great news - not once has it boiled over, or even gotten close. I know that's the dreaded danger when you make condensed milk or dulce de leche with cow's milk. (I remember the horror stories my friend Bel told me about the sticky mess all over her countertop and under her Thermomix! Eek!) Cow's milk has a tendency to do this when boiled, but I have never had a problem with dairy free milks and creams. (Hopefully no one proves me wrong!) 


Dairy Free Condensed Milk

Place ingredients in the Thermomix bowl and cook at Varoma temperature for 45 minutes on speed 4, with the rice basket on the lid (instead of the MC) to let the steam out.

- 1000g organic coconut cream (I used 18+% fat Spiral brand)
- 200g pure organic maple syrup

Leave to cool for a bit in the bowl, blend gently again on speed 3-4 for a few seconds (as it sometimes separates a little), then carefully scrape into a glass jar. This recipe will make about 400g, so it can be used to replace a tin of condensed milk in recipes.

[Note: When it's cold in the fridge you may notice little bits of coconut cream flecked through it that have kind of solidified - don't stress, if you whiz it up they disappear. And for most recipes, it wouldn't matter anyway as it will be cooked or blended with other ingredients.]

Okay, and now for the amazing Dairy Free Dulce de Leche!


Dairy Free Dulce de Leche

First make the coconut cream. Because it's going to be cooked anyway, just make raw coconut cream, it's quicker. 

[Note: If you're thinking of making this raw coconut cream to go in your fridge to be used for other things, just be aware that it will separate quite drastically - when you cook it, it stays 'together'. If it's going to be added to a recipe straight away it doesn't matter, but if you like it in your coffee (like I do), cooked is best. (Recipe for cooked coconut cream is here.)]

1. Grind up the coconut for 20 seconds on speed 9.
- 300g organic dessicated or shredded coconut 
(you can buy preservative free coconut from the health food shop)

2. Add water and blend for 1 minute on speed 9.
- 1000g (1 Litre) water

3. Strain coconut milk through a nut milk bag into a bowl, squeezing it out really well to get as much cream as you can. 

[Set the cream aside and tip the coconut pulp back into the Thermomix. Add another 300g water, blend once more for a minute on speed 9, re-strain into a separate bowl, and you have milk for another recipe. Freeze the coconut pulp, and when you have enough you can dehydrate it then grind it up to make coconut flour.]

4. Measure the coconut cream back into the Thermomix bowl. Add other ingredients and cook at Varoma temperature for 55 minutes, speed 4, with the rice basket set on top of the lid (instead of the MC) to let the steam out.
1000g (1 litre) of coconut cream
- 200g organic pure maple syrup
- 1/4 tsp bicarbonate of soda (baking soda)
- 1/2 tsp vanilla extract (not essence)

That's it! Too easy. I was jumping around the kitchen in excitement when I opened the lid of the Thermomix after making this! And if you don't believe me, just ask my taste testers - they all agreed that it was totally amazing and exciting and were very happy they'd happened to stop by for a visit at just the right time!! ;)

This recipe results in about a little over a cup of dulce de leche. Sorry I can't be more definite than that - after eight people sampled it I realised I'd forgotten to weigh out the amount! Ah well, must make it again... :D


My taste testers... and the verdict was YUM!!
(You really should try dulce de leche on warm, freshly baked spelt bread rolls - mmmm!!)

Variations: 
- Try fresh grated coconut (brown skin removed) instead of dessicated coconut for the coconut cream.
- Try a different sweetener - honey, yacon syrup, rice malt syrup, rapadura, coconut sugar... different sweeteners will result in different colours, but they should all work fine. Adjust amount to taste.
- If you can't have coconut, you could use other dairy free milks, but make sure they're thick and creamy enough that you'll get a nice thick result, or just cook for longer if needed.

Selasa, 08 Januari 2013

Raw Chocolate Truffles

 
Raw Chocolate Truffles with Dried Cranberries

Lately I've been craving these. I'm working hard this month to keep off sugars as much as possible, for my January Body Springclean Challenge! I'm only having a very small amount of natural sweeteners like fruit, dates, raw honey, pure maple syrup, yacon syrup, green stevia, and coconut sugar. That's not so hard, but it's the chocolate I miss most. So now and then I like to have a couple of these raw chocolate truffles to satisfy that sweet, chocolate craving... usually in the late afternoon when my energy levels are getting low.


I love the silky, smooth, chocolate texture of these truffles, which is achieved by using cacao wafers (or raw cacao licor as it's also known) instead of just raw cacao powder. The cacao wafers are made from raw cacao nibs ground up into a very smooth paste, then set into wafers. The cacao butter hasn't been removed, so it gives just the right creamy texture for raw chocolates and bliss balls. They don't contain any sweeteners or additives, so they are perfect for making all sorts of delicious, healthy chocolate treats!

 You can buy Changing Habits cacao wafers here.


I made up this recipe a couple of months ago and have been meaning to get it on the blog ever since, but time has gotten away. At Christmas time, I divided the mixture in two, and mixed one half with naturally sweetened dried cranberries (deeeeeelicious!), and the other half with some naked ginger and dried apricots. So so good.


I use these organic, naturally sweetened dried cranberries - ingredients are: organic dried cranberries sweetened with organic concentrated apple juice, organic Sunflower Oil (less than 0.5%). I prefer these to the sickly sweet sugary supermarket ones. And I love that they have no preservatives.

You could mix in some roughly chopped nuts instead of dried fruit, or some raw cacao nibs for extra crunch. Or just leave it smooth and plain, and press it into a square dish and cut into small squares like fudge.


Raw Chocolate Fudge

Don't be scared of the 'secret ingredient' - banana! It doesn't taste like banana - that just helps with the texture. The chocolate is so powerful it overtakes the banana. ;) Yes, this is definitely a recipe for hard-core chocolate lovers... so beware if you're one of those strange 'milk chocolate' kinda people. (Ha ha!) For me, the darker the chocolate, the better. And the good thing about dark chocolate is you only need a tiny bit to feel satisfied. So try this recipe for a deliciously healthy, naturally sweetened chocolate hit - mmmmm...


Raw Chocolate Truffles

1. Grind almonds on speed 8 for 8 seconds to make flour, and set aside.
- 150g blanched almonds

2. Grind cacao wafers and vanilla bean for 5 seconds on speed 9.
- 250g cacao wafers
- 1 vanilla bean, cut in thirds

3. Add dates and chop for 10 seconds on speed 9.
- 170g raw dates (or regular dates - chop 20 seconds)

4. Add syrup and cook for 7 minutes at 37C, speed 3.
- 50g pure maple syrup or yacon syrup

5. Add salt, reserved almond flour, and banana and mix on speed 8 until very smooth.
- pinch Himalayan salt
- reserved almond flour
- 1 ripe banana, peeled (not over-ripe, as the flavour will be too strong)

6. Either roll mixture into small balls for truffles, or press into a square dish for fudge. Place in the fridge to harden.

These truffles will last in the fridge for a couple of weeks. Unless you eat them first. ;)

Senin, 17 Desember 2012

Quick Maple Pecan Cinnamon Scrolls

* This recipe includes support for Paprika * 


Cinnamon scrolls are a favourite breakfast at Christmas time in our family. Usually I'll make a batch of yeast dough scrolls and freeze or refrigerate them unbaked, then thaw and bake them on Christmas morning. I'll be explaining more about that in the next post. But if you're wanting a quick, yeast-free version, this is a great one to try. It'll only take you about an hour from start to finish. A word of warning, though - this recipe is a little bit naughty! LOTS of butter and rapadura... But it is Christmas - that's my excuse! ;-)

For a dairy free version, you could try ghee if you can have it; or use macadamia oil in the dough, and coconut cream on the rolled out dough instead of melted butter. It won't be quite as caramelly and sticky, but still good.

Okay, keeping this short as I've been trying to get this posted for two days, and I'd better hurry up before there's a riot on Facebook!!

Oh, and speaking of my Facebook page, there are now over 10,000 of you following!! WOW! So thank you to all who follow and contribute to the discussions - I learn so much and really enjoy hearing from you all. ❤


Quick Cinnamon Scrolls
*This recipe has Paprika support*

Preheat oven to 220C. Grease a 24 cm springform tin with butter and set aside. (Or you can use ghee or coconut oil, or baking paper.)

1. Prepare filling - mix together first five ingredients on speed 5 for 5 seconds - then set aside.
- 100g Rapadura
- 100g pecans or walnuts
- 2 tsp cinnamon
- pinch of sea salt
- 1 Tbspn butter

2. Mix dry ingredients on speed 8 for 6 seconds to 'sift'.
- 450g plain, unbleached spelt flour (not wholemeal)
- 1 tsp baking powder
- 1/2 tsp baking soda
- 1/2 tsp sea salt

3. Add wet ingredients and mix on speed 6 for 6 seconds, then on interval speed for 20 seconds. (Don't forget to lock the lid, or interval speed won't work!)
- 200g almond or rice-almond milk
- 1 tsp apple cider vinegar or lemon juice (helps with rising)
- 80g soft butter
- 80g pure maple syrup

4. Sprinkle silicon dough mat (or counter top) with a light dusting of flour, and turn dough out of bowl. Give it a quick, gentle knead to form a ball, then press out gently with your hands to form a rectangle about 1 1/2 cms thick.

5. Melt butter. Spread 2 tbspns over dough and sprinkle with filling, leaving a 1 cm border around the edges.
- 4 Tbspns melted butter (Note: Reserve 2 tbspns for topping. Can be melted in tmx at 100C for 30 seconds or so, speed 1.)
- prepared filling

6. Roll up the dough into a log shape, lift carefully, and place on a cutting board. (If the dough is too sticky, roll it up in the bread mat and place in the fridge or freezer to chill until firmer and easier to handle.)

7. Cut the rolled up dough into scrolls with a large serrated knife, making the slices 2-3 cms thick. Place them in the prepared springform tin, bunched up together, cut side up. Drizzle with remaining 2 tbspns melted butter.

8. Place in hot oven and cook for 20-25 minutes, until golden brown.

9. While scrolls are cooking, make the maple glaze. Place ingredients in Thermomix bowl and cook at 100C for 2 minutes, speed 1.
- 50g pure maple syrup (or Rapadura)
- 50g coconut cream (or regular cream)
- 1/2 tsp vanilla extract

10. When scrolls are cooked, drizzle over the glaze. Serve warm.

Keep in an airtight container for a couple of days. Best eaten on day of baking. (That shouldn't be a problem. Ha ha!!)


This recipe inspired by my mum and sister's recipes, this one from Bakingdom,
and my own version, all rolled into one. :)

Jumat, 09 November 2012

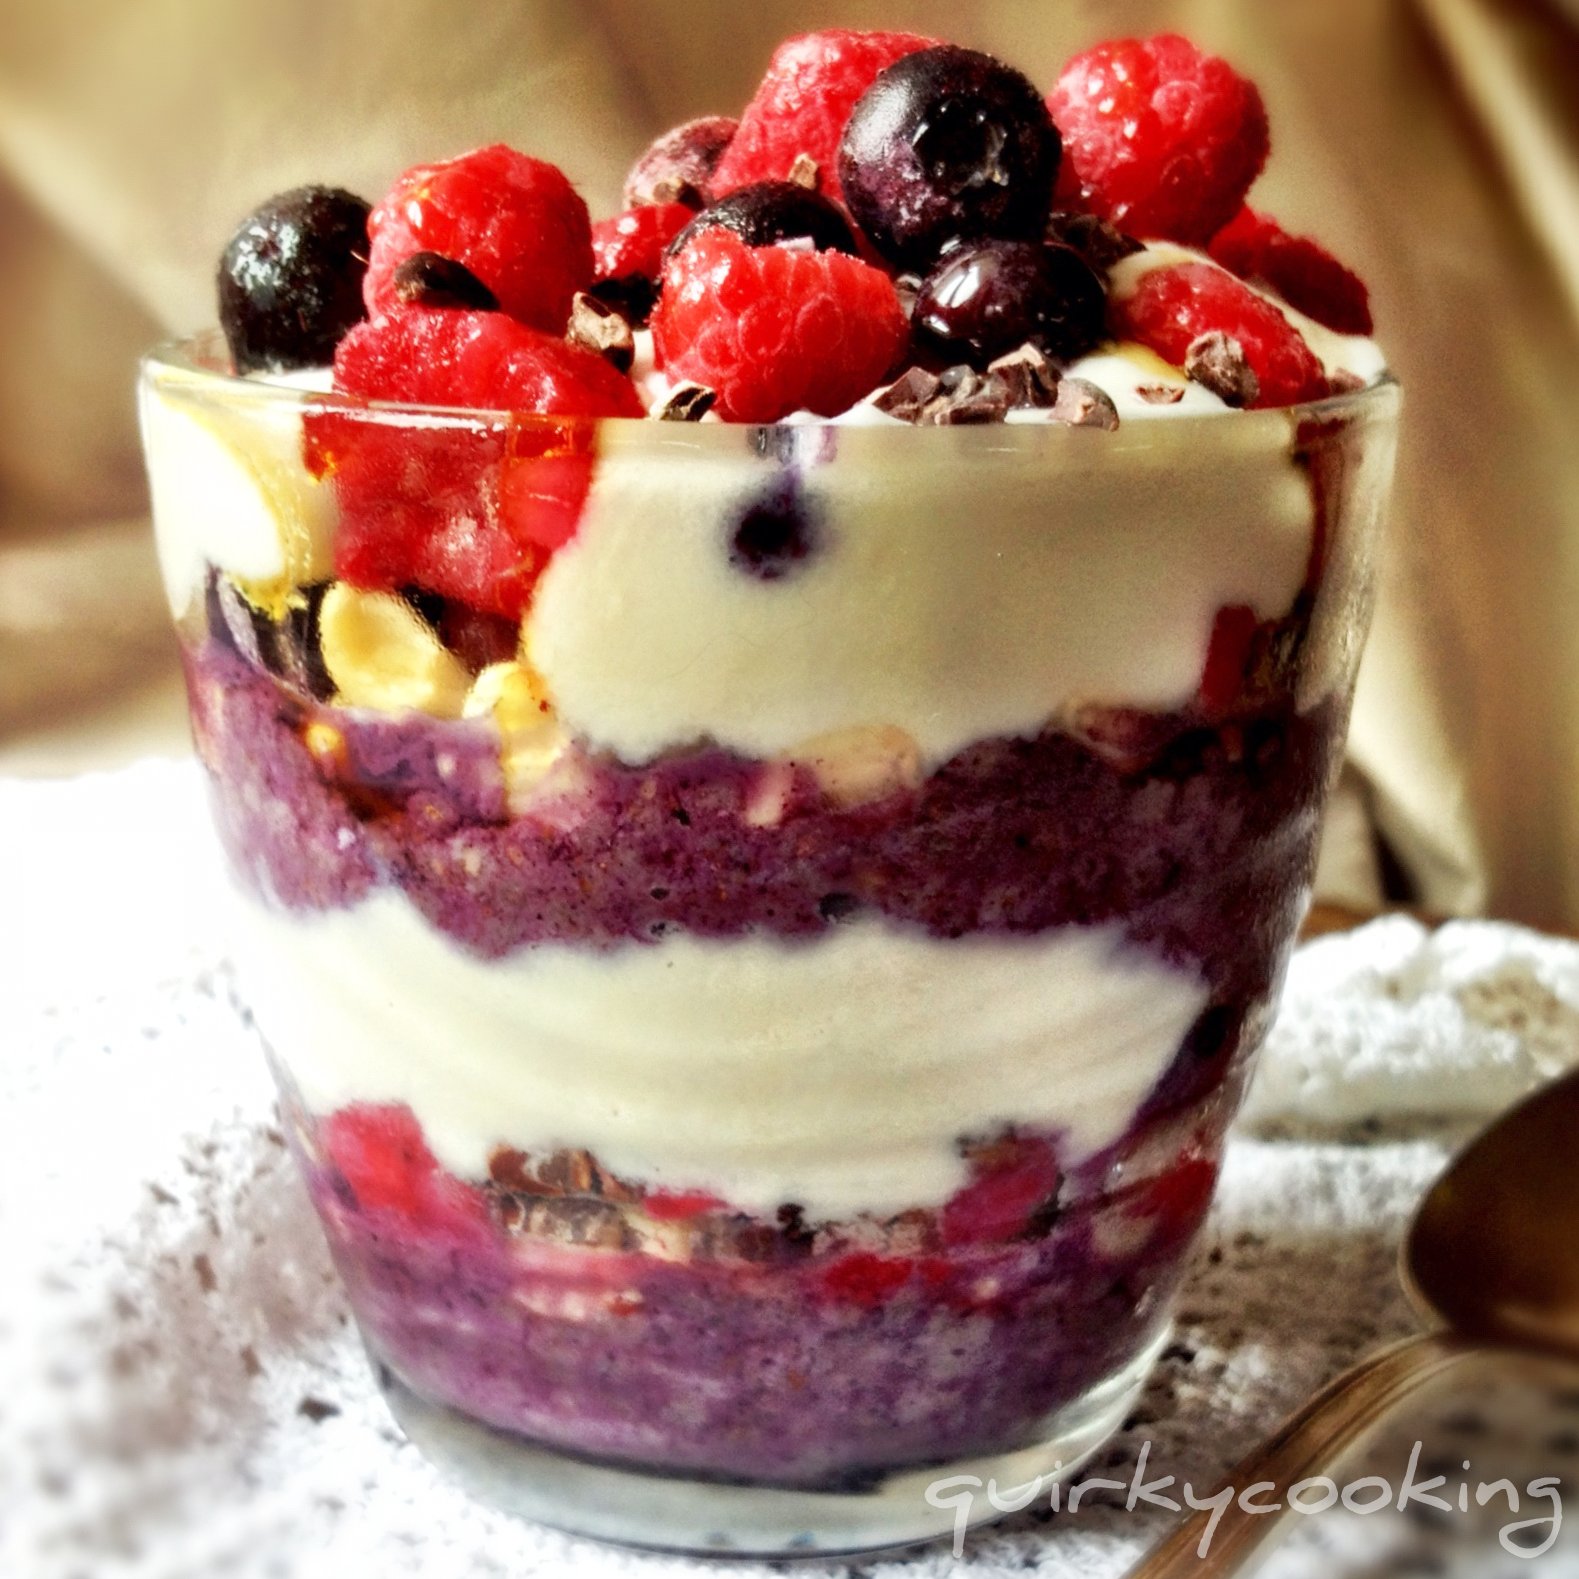
Layered Maqui Chia Pudding


Chia pudding (or porridge) is a staple part of my diet. I eat it for breakfast or morning tea, afternoon tea or supper. Sometimes all four! If I'm rushed, I eat it for lunch too. I'm kind of addicted to it. Here's why:

1. It's delicious. Think berries and cream with a chocolatey-nutty crunch!

2. It's quick and easy. It only takes 5-10 minutes to make my quick version.

3. It makes lots and lasts for a week in the fridge. So I can make up a big batch and have enough for a few days.

4. It's versatile. Every batch I make is slightly different to the last, depending on what I have on hand. (See variations below)

5. It's healthy. Chia has approximately 6 times more calcium than milk, as well as being high in Omega 3 and 6 fatty acids, and other essential minerals. Then there's all the goodness of the Maqui berry powder with it's high level of antioxidants, the coconut cream with it's lauric acid, and the benefits of whatever other superfoods you add, like goji berries and cacao nibs.

6. It's the perfect low GI, natural, 'sweet treat'. It keeps me from getting 'hangry' halfway through the morning or afternoon. {Hangry: 'A state of anger caused by a lack of food.' Know what I mean?} Chia seeds and mesquite powder are both great blood sugar stabilizers. As my mum used to say when she gave us porridge for breakfast, "It'll stick to your ribs!"

7. It travels well. I pop a batch into a jar and take it with me as I dash out the door. I even took some on the aeroplane the other day for my lunch... The guy next to me was looking at me a little strangely as I ate my pudding and drank my green smoothie from a jar, but hey, I'd rather that than the dry white bread sandwich and softdrink he had for lunch!

And if that's not enough, here's Jess the Wellness Warrior's 13 Reasons to Eat Chia Seeds Every Day!


One Layered Maqui Chia Pudding to go...

And just in case that's not enough reasons for you to try chia pudding - it looks pretty! Especially when you layer it.


There's lots of different recipes around for chia puddings and porridges, usually involving at least 40 minutes of soaking time, or soaking overnight. Sarah from 'Homemade, Healthy, Happy' has a delicious one here that I love, but I decided I wanted a quicker version - I'm usually in a last minute rush in the mornings, so 40 minutes seems a bit too long to wait for the soaking time. I find that by warming the pudding gently for a few minutes at 37C, the chia seeds soak up the liquid just as well as when they are soaked, without being 'cooked' and losing their goodness. I also wanted to make one that was kind of fun - which is why I layered it and called it a pudding instead of a porridge. ;-)

I've tried lots of different versions of chia pudding, and pretty much love them all. But this one is how I make it most of the time - with superfood Maqui powder for an antioxidant boost, plus lots of other yummy bits and pieces. My Instagram friends come up with some great combos, and I'm continually being inspired by other people's versions, like these on my Facebook page. To give you some more ideas of possible variations, here's a few others I've seen that look great!

- Coconut Water Chia Porridge (I keep meaning to try this, but I love coconut water so much that I always drink it before the porridge gets made!)

...and if you google 'chia pudding' and 'chia porridge' you'll come up with heaps more! The variations are endless.

{Note: Some people find too much chia can bother their tummy, especially if it's not soaked. If you find my quick version doesn't agree with you, try soaking the chia in the almond milk overnight in the fridge, then continue recipe as below. This is usually only the case for people with gut issues.}


Layered Maqui Chia Pudding 

First make the almond milk (below), or you can use coconut milk or coconut water instead.

1. Weigh almonds into Thermomix bowl and grind on speed 9 for 20 seconds:
- 100g raw almonds

2. Add water and blend on speed 9 for 1 minute:
- 550g filtered water

3. Add following ingredients, and cook at 37C for 5 minutes, speed 1:
- 85g chia seeds
- 1-2 tsp Mesquite powder
- 2 Tbspns Yacon syrup or raw honey
- 1 tsp ground cinnamon (optional)
- pinch of ground nutmeg (optional)
- 1 tsp vanilla bean paste
- a handful of raw cacao nibs
- a handful or two of goji berries and/or sultanas


Maqui berry powder - full of antioxidants!

4. Remove pudding to a dish or large jar to keep in the fridge. (It will be a little runny at first, but I make it like that on purpose because it gets thicker as it sits, and I don't like it too thick.) For each serving, layer the following in a glass or jar in the order given:
- a few Tblspns chia pudding
- a handful of raw cashews or macadamias
- a few blueberries
- a few raspberries
- a couple of blobs of coconut cream
- a drizzle of pure maple syrup

Repeat the layers.


Variations:

- Instead of vanilla bean paste, you can use a whole vanilla bean. Pop it in with the almonds and grind them up, then add water and blend.

- If you don't have Maqui powder or Mesquite powder, that's okay. I like to use them because they add extra goodness and the Maqui makes the chia such a lovely colour, but it will taste fine without. Try stirring in some homemade (sugar free) strawberry jam instead - my friend Emma suggested this, and it's delicious!!

- Try a coconut version: blend up the water and flesh of a young (green) coconut and use that instead of almond milk; leave out the yacon syrup or honey as the coconut water is sweet enough on it's own.

- If you can't have nuts, try coconut flakes instead, or maybe some toasted pepitas.

- Swap the coconut cream for coconut milk yoghurt, and instead of berries try some slices of mango. Drizzle over some passionfruit pulp instead of pure maple syrup.

- Try cherries with cacao nibs and chocolate covered goji berries, topped with coconut flakes. Mmmm....

- Fresh and juicy peaches, nectarines or strawberries are great too, instead of the berries.

- You could use other sweeteners besides Yacon syrup or honey or pure maple syrup - some prefer agave syrup, or coconut nectar, or carob syrup. Even stevia would work in the chia pudding. I would suggest sticking to a liquid sweetener though, as granulated sugars such as Rapadura wouldn't mix in so well.

Let me know what other great variations you come up with!


Now, for those of you who would like to try some Yacon Syrup, Mesquite Powder or Agave Syrup, Loving Earth has kindly given me some to give away. So leave a comment below saying what variation of Chia Pudding you'd like to try, and next Saturday (17th November) I'll pick 3 comments via Random.org and the winners will receive one of the above products to try! One comment each please, and let me know which product you'd prefer to win in your comment, so I can put you in the right prize draw. Woo hoo, thank you Loving Earth!!

{To find out more about all these interesting ingredients I use, click on the links and they will take you to pages with more info.}


Jumat, 16 Desember 2011

Rapadura-Maple Syrup Butter Toffee


I love to make homemade sweets for a special treat at Christmas time. There are way too many nasties and refined sweeteners in bought lollies, so it's nice to have some homemade ones to keep the kids happy. Okay, and the adults. :) This toffee recipe has been a favourite at our house for a couple of years now, ever since I found it on a great website called Deliciously Organic! Check out the original recipe here.

Unfortunately, you can't make it in the Thermomix, as you can't cook at temperatures higher than 114 degrees celcius, and to get toffee to the hard crack stage you need to get up to 150 degrees celcius. So, it's back to stirring over a hot stove for this one - but it's worth it! I do make the chocolate (or melt the chocolate) and chop the nuts in the Thermomix though.

If you don't have a candy thermometer, don't worry - neither do I. I've always cooked candies the old-fashioned way, ever since I was a little kid. Mum taught me the method of holding the wooden spoon up to see how the candy drips, and dropping bits in a cup of cool water to see how it sets. Here's an explanation of the cold water testing method, and how to tell what temperature your toffee has reached. For this recipe (or any toffee or lollipop recipe where you want 'crunch'), your syrup needs to reach the hard crack stage (300 degrees F / 150 degrees C). I'll explain a bit more about the 'how to' below.

You can do all sorts of variations with this recipe - the photo above has dark chocolate and sprinkles on some, and toasted pecans and dark chocolate on the other. You can use whatever nuts you like, or leave the nuts out and top with sprinkles instead. I use Hopper sprinkles - they are made from fruit & vege extracts, no artificial colours, flavours or preservatives. They are also gluten free, dairy free, egg free and nut free. For the chocolate, I prefer to make my own (with this recipe), but since I didn't have any cacao butter left I used Lindt 70% cocoa chocolate.


Here's how I make it:

1. First, toast 2 cups of nuts if you want nuts in the toffee. (Whatever nuts you like - almonds, macadamias, pecans, brazil nuts - even pine nuts.) Start with raw, unsalted nuts and toast them in the oven on 180 degrees C for 10-15 minutes, stirring once or twice, then roughly chop in the Thermomix (or leave whole if you like).

2. Then prepare a tray for the toffee - either grease a pizza or biscuit tray with butter, or line it with baking paper.

3. Measure into a large, heavy based saucepan and mix with a wooden spoon over medium heat:
- 1 1/4 cups Rapadura
- 1/3 cup pure maple syrup
- 1/3 water

4. Once it starts to bubble, turn the heat down to low and let it simmer for 3-4 minutes.

4. Stir in the butter:
- 225g (1 cup) butter (place a bowl on the Thermomix & weigh the butter into it - it's easier than measuring it into a cup!)

5. Continue to simmer until mixture reaches 150 degrees celcius (if you have a candy thermometer) - or hard crack stage (if you don't).

Testing to see if toffee is at hard crack stage:

Have a cup of cool water handy. As mixture simmers over low heat, try to only stir it a little now and then. Don't constantly stir it or you'll end up with a grainy, fudge-like texture. You want to keep the sugar from crystallizing on the sides of the pan - if it starts to do that, brush down the sides with a pastry brush (preferably silicon) dipped in water.

You'll notice the mixture starting to get darker and thicker after a few minutes. Give it a gentle stir, then hold the spoon up and let most of the mixture drip off. The last couple of drips will become a string of toffee - if the string thins out to a fly-away hair, it's about ready. (See picture below)

Let the string of toffee drip into the cup of cool water. If it hardens quickly into a brittle thread that snaps when you bend it (or crunches when you bite it) the toffee is ready - take it off the heat immediately! There's a fine line between ready and burnt. (Be careful it's not too hot before you pop it into your mouth to taste it!!)

6. Quickly stir in the salt, baking soda and nuts, making sure there's no soda lumps:
- 1 tsp fine sea salt
- 1/2 tsp baking soda
- 1 cup toasted, roughly chopped nuts (optional)

7. Pour the toffee onto the prepared tray, working quickly before it sets in the pan. Spread it flat with the spoon and leave in a cool place to set.

8. Meanwhile, chop (speed 5) then melt the chocolate in the Thermomix on 50 degrees for 3-4 minutes, speed 3:
- 200g dark chocolate, broken in pieces

9. Spread the melted chocolate over the toffee with a spatula, then sprinkle with the remaining chopped nuts, or with sprinkles. Place toffee in the freezer to set hard.

10. When it's ready, crack the toffee into shards with the point of a sharp knife.

I find this keeps best in the freezer in our hot, humid climate - I leave it in one big piece and crack some off as we want it, or break into smaller pieces and place in ziploc bags.


Make a couple of batches and share it with your friends - it's perfect for Christmas presents! You can make a little paper box, line it with baking paper, add the toffee pieces and pop on the lid. Sweet!

Here's a link to making your own paper gift boxes - I use a large, square sheet of scrapbooking paper for the lid of the box, and another for the bottom of the box. Cut 1 centimetre off two adjacent sides of the second sheet for the bottom of the box, so the lid will fit over. Use the offcuts to make a curly decoration for the lid, stuck on with double sided tape.

Minggu, 11 September 2011

Gooey Chocolate Icing (dairy free, sugar free, vegan)


Here we are, a couple of days into our (mostly) grain free, sugar free, dairy free challenge, and I realize I'm going to have to make a birthday cake for my youngest that will not make her want to live permanently at Grandma's house! What to do? She had asked for a plain chocolate cake, which I quickly agreed to a few days ago, thinking I'd just whiz up our favourite, quick chocolate cake in the Thermomix (Cyndi O'Meara's Chocolate Cake from her "Changing Habits, Changing Lives Cookbook", made with spelt flour and rice-almond milk). Sigh. Couldn't do that, has grains in it. I thought about making the Flourless Chocolate Hazelnut Brownies in a cake tin, but I didn't have any hazelnuts. I couldn't make the Flourless Chocolate Espresso Cake because it has lots of chocolate in it - too much sugar. Torte Caprese? No, way too much sugar! Hmmm... So I decided to make a chocolate cake based on my Flourless Pecan Cake recipe instead. 

I had some leftover ground almonds, so I chucked them in, added some pecans and started grinding them up... then realized I didn't have any coconut cream! And so a new recipe was born. It has some pretty cool changes - a couple of surprise ingredients which help to cut down the Rapadura to 40g, and keep it moist and rich. I'll share the recipe soon, as I'm still tweaking it, because I want to be sure it's 'just right' before I post it for you all to try! (You never can have too many chocolate cake recipes, right?)


Anyway, I digress. What I wanted to say was after making this grain free chocolate cake, I decided it really would be better with some icing. And surely my eight year old wouldn't argue if I put some icing on her 'plain chocolate cake'? I'd been meaning to work out another dairy free, sugar free icing that didn't involve margerine (ick, one of my pet hates!) or chocolate pieces (because you don't always have chocolate on hand, especially if you have a husband like mine who steals it and leaves the empty packet in the fridge so you don't realize!)... and anyway, I couldn't use chocolate unless it was my healthy homemade one, because we're avoiding sugar. So, with some internet research and a bit of imaginative tweaking, I came up with this simple, delicious recipe! Hope you like it as much as we did. (Yep, it's all gone. At least it will be when I get back into the kitchen. :D )

Makes enough icing for one 20cm round cake (spread thickly!)


1. Grind cashews for 10 seconds, speed 9, until fine:
- 100g raw cashews*

2. Add remaining ingredients and mix at speed 6 for 30 seconds, scrape down, add a little more water if needed, and mix another 30 seconds until smooth:
- 3 fresh pitted dates
- 20g raw cacao powder
- 1 tsp vanilla extract
- 20g pure maple syrup
- 20g filtered water

Spread the icing thickly on your cake and enjoy, guilt free!! 

* Next time I'll try soaking the cashews for half an hour first, then grind up all the ingredients at once. This might make a smoother icing. I was too impatient to try it this time!

Selasa, 07 Desember 2010

Berry Nougat with Raw Cacao Nibs


This recipe is an old favourite of ours from the raw food cookbook "Rejuvenate Your Life" by Serene Allison, except with a couple of tweaks of my own. I've added raw cacao nibs, for a delicious, chocolatey crunch, and I use my homemade nut butter. I make this quite often for snacks, desserts, cake toppings, and even for breakfast... it's delicious. The amounts can vary to taste, so don't stress too much about measuring. I make my own nut butter first in the Thermomix - it's very quick and easy.  Otherwise you can use bought almond butter if you like.

You can let the berry nougat thaw a little before eating, or have it still frozen - I like it about halfway in between frozen and thawed, as it's juicier and has more flavour. You can keep it in the freezer and just thaw it out a little when you want some. It's delicious on it's own, or on top of a raw cheesecake or a chocolate gateau or torte caprese - especially with chocolate drizzled over the top!

Recipe makes a little over 4 cups.


1. In Thermomix bowl, chop almonds on speed 6 for about 5 seconds, or until roughly chopped:
- 100g raw almonds

2.  Add and mix on speed 3 for a few seconds, until combined:
- a couple of heaped tablespoons of almond butter (or mixed nut butter) (to 'glue' it together)
- a handful or two of raisins or sultanas (for chewiness)
- 30g pure maple syrup
 (to taste - make sure it's still tangy, not too sweet)
- a handful of raw cacao nibs


3.  Add and mix in on reverse speed 2 for a few seconds:
- about 400g of frozen mixed berries
 

Sabtu, 17 April 2010

Breakfast Sorbet

Mmmm... sorbet for breakfast!

Here's a different version of sorbet that's a lot more filling, and perfect for breakfast or an energizing morning tea snack!  My friend Nancy came up with the idea (inspired by the muesli and protein shakes in Cyndi O'Meara's cookbook Changing Habits Changing Lives),and I've changed it a little to make it dairy free and a bit more 'chewy'.  Nancy's version has a good dollop of natural yoghurt in it, which is nice if you can handle yoghurt - or if you want to you can use coconut cream instead.  I add sultanas at the end for a bit of sweet chewiness, and sprinkle some chopped nuts on top. If you can't be bothered you can add them all at once with everything else. Feel free to play with the ingredients and amounts, but don't fill the bowl too full, as it makes it difficult to mix.

1.  Toss into your Thermomix bowl (weighing them if you want to be particular!), and grind on speed 9 for about 30 seconds, using the spatula to assist:
- 40g raw almonds/macadamias/cashews
- 30g rolled oats or quinoa flakes
- 25g seeds - pepitas, sunflower, linseeds, chia seeds
- 30g tahini
- 30g sultanas
- 250g ice

2.  Next add the berries and grind them up on speed 9 for about 15 seconds:
- 250g frozen mixed berries

3.  Then add the remaining ingredients and mix on speed 9 for about 2 minutes, using spatula, mixing until creamy:
- 250g frozen bananas, chopped in 1 inch pieces
- 40g pure maple syrup or raw honey (or to taste)
- 50g yoghurt or coconut cream (optional)

4.  For extra yumminess, add some extra sultanas and/or chopped nuts and stir on speed 3 until mixed in, or sprinkle them on top:
- 30g sultanas
- 30g chopped nuts (I like pecans)

[Note: For a smoother version, grind up the dry ingredients first (seeds, nuts, oats/quinoa) until fine; add ice and grind; add frozen berries and grind; then add remaining ingredients.] 

Enjoy!

P.S. Freeze any leftovers in a sealed container or ice cube trays.  When you're ready to use it, thaw for a few minutes and remix in Thermomix to whip it up again.