Tampilkan postingan dengan label berries. Tampilkan semua postingan

Rabu, 06 Februari 2013

Banana Raspberry Muffins


Do you know what's so special about these muffins? (Besides the fact that they look and taste awesome?) You can make them with whatever bits and pieces of grains and seeds and nuts and flours you have lurking in your fridge, freezer and cupboard, and they will be a.m.a.z.i.n.g.

Really.

Here's the secret... Soaking!

Yes, if you soak your grains, seeds, nuts, etc, overnight in water with a little bit of something acidic (like apple cider vinegar, lemon juice, whey or yoghurt), you will be amazed at the difference in the texture. The soaking softens the grains/seeds/nuts so that you don't have that dry, gritty texture that can often be the outcome in gluten free baking. And it helps to break down the anti-nutrients that cause irritation to the gut, and helps to release the beneficial nutrients. Basically, it makes them much easier to digest, AND yummier!

[Note: If you're worried about using the soaking water, don't be. You don't need to throw out the water that the grains have been soaked in, as the soaking actually causes the phytase to increase and break down the phytates. The phytates aren't just leaching out into the water and staying there, they are being broken down. The only reason you would throw out the water and rinse the grains is if the water tasted sour or bitter.]

Okay, so don't think I'm telling you this because I've got this soaking thing all under control. I'm the world's worst 'last minute' cook - I get a sudden inspiration and have to make it right away! Which means....ummm... unsoaked. But when you can, it is best to think ahead - prepare, soak, ferment, sprout... all that good stuff. :)

A good way to plan ahead is to think about breakfast tomorrow at dinner time tonight. If you'd like to have muffins, pancakes, waffles or crepes for breakfast, either grind the grains up and then soak overnight with the liquids from the recipe, or in some cases (like these muffins), soak the grains & nuts whole. To use whole grains/nuts it needs to be a recipe that has quite a lot of liquid - a batter, not a dough. When you blend it, it needs to be able to create a 'vortex' in the Thermomix - if it doesn't, it's too thick for this method.

I have posted a few of these 'blender batter' recipes before, but I've been going through a lot of my older recipes and tweaking them to reduce the sugars. So here's one of my latest versions of the Blender Batter Muffins, with a lot less sweetening, and my latest combo of grains, seeds and nuts.

By the way, if you don't have a Thermomix, you can try this method in a really powerful blender that crushes ice. But please don't burn out the motor and blame it on me. Unless you just really want a Thermomix, so you're purposely breaking all your appliances so your partner will give in and let you buy one. ;) Otherwise, you could just buy the pre-ground flours and mix them in a mixer with the liquids, then soak overnight, and continue with recipe. Your call.


Makes approx. 2 dozen regular sized muffins

1. First of all, prepare the grains, seeds & nuts for soaking. This needs to be done at least 12 hours (or up to 24 hours) ahead. Weigh them into a glass bowl or dish, then weigh in the liquids. (Set the empty dish on the top of the Thermomix, zero scales, and weigh in the grains, water, etc.) Cover, and set aside for the night.
- 290g whole grains and seeds, your choice *(see note)
- 40g raw almonds (or sunflower seeds/pepitas for nut free version)
- 200g water
- 1 tsp apple cider vinegar (or whey/yoghurt/lemon juice)

(Note: For the muffins in the photo above, I used a couple of handfuls of buckwheat kernels, some millet, a little bit of quinoa, some brown rice and a couple of Tbspns mesquite flour. There's so many different gluten free grains and seeds that you can use - amaranth, teff and sorghum are great too - whatever you have, just so long as it all adds up to 290g. Although if you use a lot of buckwheat you'll need more water as it soaks up the moisture. And don't use coconut flour because it works differently and the ratio of flour to water would be totally out.)

2. When you're ready to make the muffins, tip the soaked grains, seeds & nuts into the Thermomix bowl (with the soaking water) and add oil, syrup, cream, bananas and eggs; then blend on speed 9 for 2 minutes.
- 20g macadamia oil (or other light flavoured oil)
- 60g pure maple syrup (or honey)
- 30g coconut cream (or milk of choice)
- 2 large bananas
- 2 large eggs

3. Scrape down sides of bowl and make sure mixture is smooth. If not, reblend for another minute. Once smooth, add the baking powder, soda and salt, and just barely mix in on speed 5 for 5 seconds.
- 2 tsps baking powder
- 3/4 tsp baking soda
- 1/2 tsp fine sea salt

4. Pour mixture into muffin cups, filling to 3/4 full. Top with a few raspberries, and bake in 190C oven for 20-25 minutes, or until skewer inserted in muffin comes out clean.

Variation: For Banana Spice Muffins, add 1 tsp cinnamon & 1/2 tsp nutmeg to batter, leave the berries off, and sprinkle muffins with cinnamon and Rapadura or coconut sugar before baking. Can also add a couple of handfuls of pecans or walnuts to batter with the baking powder & soda.

Jumat, 09 November 2012

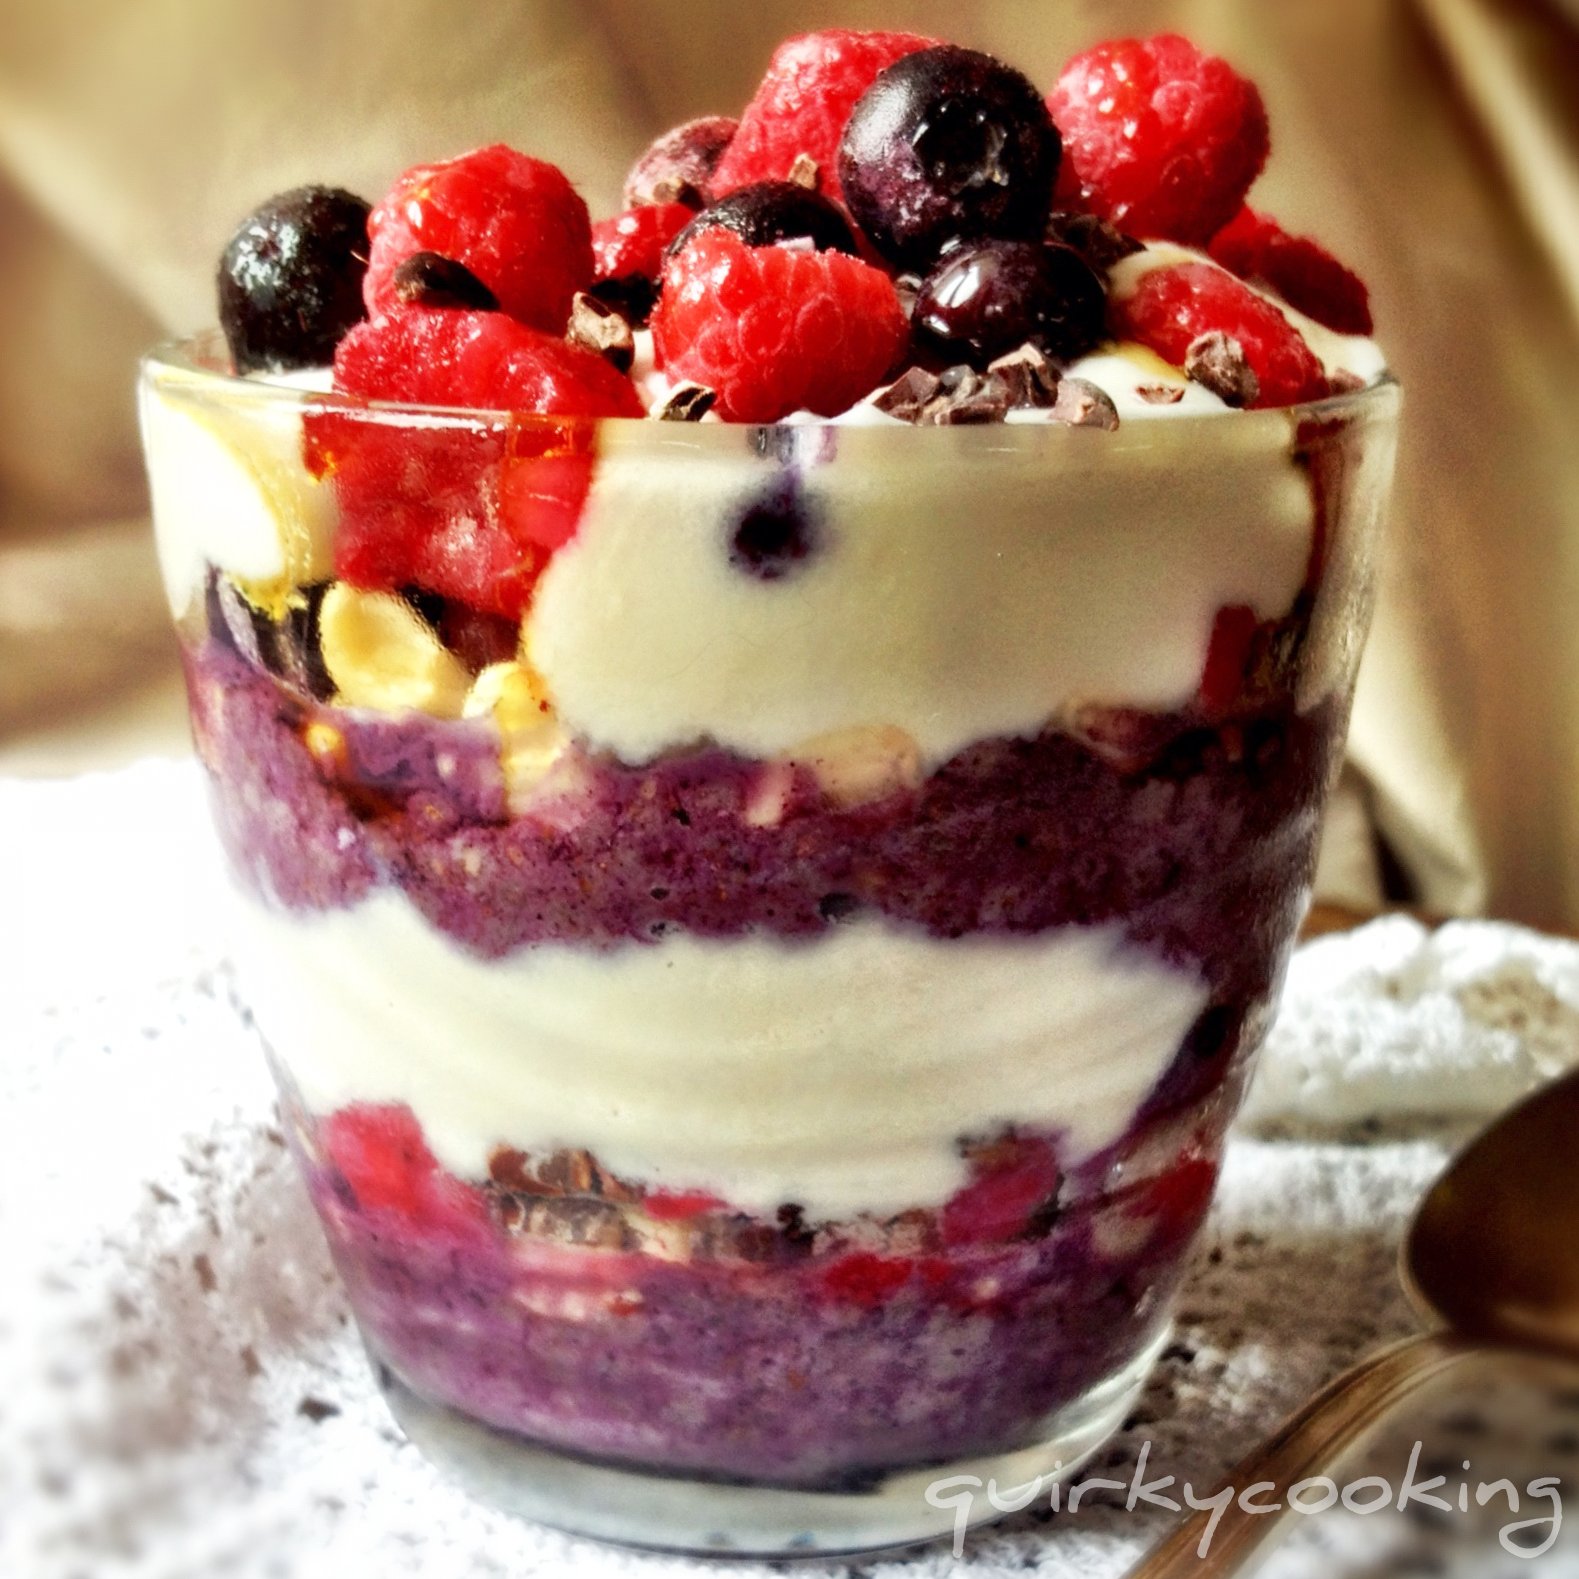
Layered Maqui Chia Pudding


Chia pudding (or porridge) is a staple part of my diet. I eat it for breakfast or morning tea, afternoon tea or supper. Sometimes all four! If I'm rushed, I eat it for lunch too. I'm kind of addicted to it. Here's why:

1. It's delicious. Think berries and cream with a chocolatey-nutty crunch!

2. It's quick and easy. It only takes 5-10 minutes to make my quick version.

3. It makes lots and lasts for a week in the fridge. So I can make up a big batch and have enough for a few days.

4. It's versatile. Every batch I make is slightly different to the last, depending on what I have on hand. (See variations below)

5. It's healthy. Chia has approximately 6 times more calcium than milk, as well as being high in Omega 3 and 6 fatty acids, and other essential minerals. Then there's all the goodness of the Maqui berry powder with it's high level of antioxidants, the coconut cream with it's lauric acid, and the benefits of whatever other superfoods you add, like goji berries and cacao nibs.

6. It's the perfect low GI, natural, 'sweet treat'. It keeps me from getting 'hangry' halfway through the morning or afternoon. {Hangry: 'A state of anger caused by a lack of food.' Know what I mean?} Chia seeds and mesquite powder are both great blood sugar stabilizers. As my mum used to say when she gave us porridge for breakfast, "It'll stick to your ribs!"

7. It travels well. I pop a batch into a jar and take it with me as I dash out the door. I even took some on the aeroplane the other day for my lunch... The guy next to me was looking at me a little strangely as I ate my pudding and drank my green smoothie from a jar, but hey, I'd rather that than the dry white bread sandwich and softdrink he had for lunch!

And if that's not enough, here's Jess the Wellness Warrior's 13 Reasons to Eat Chia Seeds Every Day!


One Layered Maqui Chia Pudding to go...

And just in case that's not enough reasons for you to try chia pudding - it looks pretty! Especially when you layer it.


There's lots of different recipes around for chia puddings and porridges, usually involving at least 40 minutes of soaking time, or soaking overnight. Sarah from 'Homemade, Healthy, Happy' has a delicious one here that I love, but I decided I wanted a quicker version - I'm usually in a last minute rush in the mornings, so 40 minutes seems a bit too long to wait for the soaking time. I find that by warming the pudding gently for a few minutes at 37C, the chia seeds soak up the liquid just as well as when they are soaked, without being 'cooked' and losing their goodness. I also wanted to make one that was kind of fun - which is why I layered it and called it a pudding instead of a porridge. ;-)

I've tried lots of different versions of chia pudding, and pretty much love them all. But this one is how I make it most of the time - with superfood Maqui powder for an antioxidant boost, plus lots of other yummy bits and pieces. My Instagram friends come up with some great combos, and I'm continually being inspired by other people's versions, like these on my Facebook page. To give you some more ideas of possible variations, here's a few others I've seen that look great!

- Coconut Water Chia Porridge (I keep meaning to try this, but I love coconut water so much that I always drink it before the porridge gets made!)

...and if you google 'chia pudding' and 'chia porridge' you'll come up with heaps more! The variations are endless.

{Note: Some people find too much chia can bother their tummy, especially if it's not soaked. If you find my quick version doesn't agree with you, try soaking the chia in the almond milk overnight in the fridge, then continue recipe as below. This is usually only the case for people with gut issues.}


Layered Maqui Chia Pudding 

First make the almond milk (below), or you can use coconut milk or coconut water instead.

1. Weigh almonds into Thermomix bowl and grind on speed 9 for 20 seconds:
- 100g raw almonds

2. Add water and blend on speed 9 for 1 minute:
- 550g filtered water

3. Add following ingredients, and cook at 37C for 5 minutes, speed 1:
- 85g chia seeds
- 1-2 tsp Mesquite powder
- 2 Tbspns Yacon syrup or raw honey
- 1 tsp ground cinnamon (optional)
- pinch of ground nutmeg (optional)
- 1 tsp vanilla bean paste
- a handful of raw cacao nibs
- a handful or two of goji berries and/or sultanas


Maqui berry powder - full of antioxidants!

4. Remove pudding to a dish or large jar to keep in the fridge. (It will be a little runny at first, but I make it like that on purpose because it gets thicker as it sits, and I don't like it too thick.) For each serving, layer the following in a glass or jar in the order given:
- a few Tblspns chia pudding
- a handful of raw cashews or macadamias
- a few blueberries
- a few raspberries
- a couple of blobs of coconut cream
- a drizzle of pure maple syrup

Repeat the layers.


Variations:

- Instead of vanilla bean paste, you can use a whole vanilla bean. Pop it in with the almonds and grind them up, then add water and blend.

- If you don't have Maqui powder or Mesquite powder, that's okay. I like to use them because they add extra goodness and the Maqui makes the chia such a lovely colour, but it will taste fine without. Try stirring in some homemade (sugar free) strawberry jam instead - my friend Emma suggested this, and it's delicious!!

- Try a coconut version: blend up the water and flesh of a young (green) coconut and use that instead of almond milk; leave out the yacon syrup or honey as the coconut water is sweet enough on it's own.

- If you can't have nuts, try coconut flakes instead, or maybe some toasted pepitas.

- Swap the coconut cream for coconut milk yoghurt, and instead of berries try some slices of mango. Drizzle over some passionfruit pulp instead of pure maple syrup.

- Try cherries with cacao nibs and chocolate covered goji berries, topped with coconut flakes. Mmmm....

- Fresh and juicy peaches, nectarines or strawberries are great too, instead of the berries.

- You could use other sweeteners besides Yacon syrup or honey or pure maple syrup - some prefer agave syrup, or coconut nectar, or carob syrup. Even stevia would work in the chia pudding. I would suggest sticking to a liquid sweetener though, as granulated sugars such as Rapadura wouldn't mix in so well.

Let me know what other great variations you come up with!


Now, for those of you who would like to try some Yacon Syrup, Mesquite Powder or Agave Syrup, Loving Earth has kindly given me some to give away. So leave a comment below saying what variation of Chia Pudding you'd like to try, and next Saturday (17th November) I'll pick 3 comments via Random.org and the winners will receive one of the above products to try! One comment each please, and let me know which product you'd prefer to win in your comment, so I can put you in the right prize draw. Woo hoo, thank you Loving Earth!!

{To find out more about all these interesting ingredients I use, click on the links and they will take you to pages with more info.}


Sabtu, 13 Oktober 2012

Raw Superfood Fudge


Warning: this fudge disappears quickly!
(naturally sweetened with dates & stevia; gluten free, grain free, dairy free, egg free)

Here's a chocolate treat that you can eat guilt-free, which will help to control those chocolate cravings without overloading your body with sugar. It is not only raw and naturally sweetened, but full of antioxidants, vitamin C, protein, fibre, magnesium, immune system boosters and other nutrients to nourish your body. The raw cacao is a great pick-me-up, and I often find myself reaching for it after lunch when I need an energy boost. I tell my kids this is one sweet treat they can eat as much as they like of, which makes them pretty happy! (Although it's quite rich, so they never eat more than two or three pieces at a time.)

To maximise the goodness of this fudge, I've used two of Loving Earth's superfood powders. Rainbow Superfood Blend is quickly becoming my favourite superfood powder, because instead of opening lots of packets and jars and combining powders, I can just grab this one jar and scoop out a spoonful of maqui berry, acai, AFA, gubinge (Kakadu plum) and camu camu powders. It just simplifies things. I also add some extra maqui berry powder as this is a 'fruity' fudge! It gives it an extra depth of flavour, plus even more goodness. (If you're not sure what any of those are and why they're so good for you, click on the links to see an explanation, as well as ideas of how to use them.)

I also like to add dried, organic cherries to my fudge, or a couple of handfuls of goji berries. If you don't have any, you can either leave them out, or add some sultanas instead.

 
WIN a jar of Loving Earth's Maqui or Rainbow Superfood Powders!

Okay, so here's the exciting news... You have the chance to WIN one of the above superfood powders from Loving Earth!! They have kindly sent me some goodies to give away, so for your chance to win one of these amazing jars of goodness, just leave a comment on this post saying what you would make with it if you had some to try. There will be two winners drawn randomly in one weeks' time, on Saturday 20th October, 2012, at 5pm. The first winner will receive a 150g jar of Rainbow Superfood Blend (worth $44.90), and the second winner will receive a jar of Maqui Powder (worth $39.90). (This competition is only open to Australian residents - sorry to my overseas followers, but postage is horrendous these days! If you are desperate to try it, you can order online from Loving Earth.)

Okay, so here's my recipe for Raw Superfood Fudge ~ try it out, and don't forget to leave a comment! Enjoy :)

1. Grind up in your Thermomix on speed 9 for 30 seconds:
- 1 whole vanilla bean, snipped in a couple of pieces (no need to scrape out seeds)
- 100g raw cacao nibs

2. Add and grind on speed 9 for 10 seconds:
- 100g raw walnuts
- 100g raw cashews


[Note: nuts that are high in enzyme inhibitors (like walnuts) are easier to digest if they have been 'activated' - soaked, rinsed, then dehydrated. You can do this yourself, or you can buy them activated here. You can use regular raw nuts if that's all you have. Any combination of nuts will work - I like cashews & walnuts as they are oily, so they make a 'creamier' fudge.]

3. Add and process on speed 9 for a minute, or until fudge is smooth and begins to form a ball (as in picture below):
- 100g raw dates
- 80g coconut butter
(make your own from dried coconut)
- 60g coconut oil (sometimes called coconut butter)
- 1 heaped tsp Rainbow Superfood Blend
- 1 heaped tsp Maqui Berry Powder
- 10 drops vanilla stevia or a pinch of green stevia powder (optional)
- pinch of Himalayan salt


4. Mix in on speed 3 for a few seconds:
- a handful of dried sour cherries or goji berries

5. Press mixture into a square or small rectangular dish (I use a Pyrex glass dish), and pop into the fridge to set. If you like, you can make the mixture into balls instead of squares. Keep refrigerated or it will soften and crumble.


(This is not a paid post, although Loving Earth did send me some samples and giveaways. But even if they hadn't, I would still link to them because I LOVE their products!! I think I should maybe just move into their warehouse...)

Minggu, 07 Oktober 2012

Superfood Trail Mix Clusters (Nut Free)


Superfood Trail Mix Clusters
 
Well, it's back to school tomorrow for the kids here in Queensland, and we've been tossing around lots of healthy lunch box ideas here on my Facebook page. While we were chatting, I remembered I'd been meaning to come up with a trail mix my kids would like... they're not too keen on the usual nuts and sultanas ones. So I dashed off to the kitchen and emptied half my pantry onto the bench, had a bit of a brainstorm, and this is what I came up with. Instead of a traditional trail mix, I made the mixture into little clusters, as I think it's easier to eat this way.

I used superfood berries and dried cherries instead of sultanas; seeds and shredded coconut instead of nuts; and Cacao Crunch instead of chocolate chips. (Cacao Crunch is cacao nibs rolled in a liquified form of the roasted nibs, then rolled in panela (Rapadura) - so yum! Very lightly sweet, but chocolatey and full of antioxidants!)


Cacao Crunch
For a great energy boost, munch on a small handful of these... but beware, don't eat them before bed, or you won't sleep! (I know this by experience...lol)


If you don't have the berries and cherries, just substitute with whatever you have - dried apricots or peaches chopped in bits, sultanas, currants, etc. I would suggest you try the goji berries and goldenberries, though, if you possibly can, as they're lovely and tart and SO good for you! (And again, very high in antioxidants!)

Here's some of the ingredients I used in my trail mix clusters...
 
 
Goji Berries, Cacao Crunch, Goldenberries, Organic Dried Cherries, Coconut Butter (homemade from shredded coconut) and Organic Shredded Coconut (all available from most health food stores or online)


Goldenberries, goji berries and Cacao Crunch - yum!


Superfood Trail Mix Clusters (Nut Free)

1. First, make a batch of coconut butter and remove to a jar or bowl. Or if you like, you could use bought coconut butter. (You'll need 150g.) I don't mean coconut oil, I mean dried coconut which is ground up to make a paste (like a nut butter) which sets hard as it cools. (Keep coconut butter in a jar in the cupboard - it gets too hard in the fridge.)

I used coconut butter I already had in a jar, and just chopped it up a bit with a knife so it was all crumbly. (See photo below)


2. Weigh coconut butter into Thermomix bowl:
- 150g coconut butter
 
3. Add remaining ingredients to Thermomix and mix on reverse, speed 3, for about 10 seconds or until well combined:
- 15g shredded dried organic coconut (or coconut flakes), unsweetened
- 35g goji berries
- 50g Cacao Crunch
- 40g Goldenberries
- 60g pepitas
- 30g sunflower seeds
- 60g dried organic cherries
- 50g coconut oil (extra virgin)
- 10 to 15 drops vanilla liquid stevia (or plain), or to taste
 
Mixture should be damp, and sticking together, like this:


3. Pour mixture out onto a tray and flatten a bit with your hands. Pop it into the freezer for a bit, until coconut oil solidifies.
 
4. Break apart gently into little clusters. Place handfuls into little ziploc bags and keep them in the freezer to put into lunchboxes, or to grab as you run out the door for an on-the-go snack.


Note: If the weather is hot and there's no cold pack in the lunch box, these clusters may fall apart. Don't worry, they can just be eaten crumbly like a 'normal' trail mix, too. :)
 
 
Variation:
 
Instead of letting mixture set on a tray in the freezer, press mixture firmly into chocolate molds, then freeze for a while. Pop them out of molds and keep in a bag in the freezer.


Enjoy!

Senin, 10 September 2012

Strawberry Milk (dairy free)


Strawberry milk and chocolate cake for afternoon tea
 
Okay, here's a really quick recipe for those of you who miss strawberry flavoured milk since you got healthy and stopped buying the sugar-filled fake stuff! This is my healthy, dairy free, sugar free version. It's so simple it's hardly even a recipe at all. But I decided to post it here instead of just on my Facebook page since I haven't posted anything on my blog for about three weeks - eek!! And also because I keep getting hassled for the recipe. ;-) Keeping it simple tonight, had a big day, so here it is...

Oh, by the way, the cake in the photo above is also dairy free - and gluten free, egg free and naturally sweetened... here it is here: Gluten Free Chocolate Banana Cake.

1. Grind in your Thermomix for 20 seconds on speed 9:
- 100g blanched almonds or raw cashews

2. Add ice and grind for another 10 seconds on speed 9:
- 2 or 3 big handfuls of ice cubes

3. Add remaining ingredients and blend for 1 minute on speed 9:
- 1 punnet strawberries (250g), hulled
- 30g pure maple syrup or other sweetener, to taste
- 500g filtered water

That's it! Enjoy :)

Note: if you just have frozen strawberries, skip the ice and grind up the strawberries in step 2, then add water and sweetener.

Sabtu, 11 Juni 2011

Chocolate Mousse with Blueberries & Chocolate Blueberry Almond Dirt


We've had a lovely week this week with my little brother up for a visit. He lives 2000 kms away and it's just too far! It was so good to get to spend some time with him again. I wanted to make him a special dessert, so after playing with a few different ideas,  I decided on chocolate mousse. If in doubt, always choose chocolate! And just to make sure it wasn't dull and boring, I thought I'd add some blueberries and chocolate 'dirt'. 

I've never actually seen any recipes for chocolate dirt (although I'm sure they're there), and I was in a hurry, so I made my own up. I figured it would be good made out of dried blueberries, my homemade dark chocolate, Rapadura and almonds. Unfortunately, I didn't have any dried blueberries or homemade chocolate on hand, and after a busy day I only had half an hour left to invent my dessert, so I frantically dug the Lindt blueberry chocolate out of the freezer (where I'd been hiding it!) and used that instead. (I always seem to work best to a deadline!) And everyone was kind enough to wait for dinner until I'd gotten the mousse whipped up and popped in the freezer to set. They were all glad they'd waited. :)

Here's what I did. 

First I made the 'dirt':

Chocolate Blueberry Almond Dirt

1. Grind up the Rapadura in the Thermomix to make it fine, about 30 seconds on speed 9:
- 50g Rapadura

2. Add and grind on speed 9 for a few seconds, until 'dirt' consistency:
- 50g raw almonds 
- 50g blueberry Lindt chocolate 
(or try dried blueberries, almonds & plain dark homemade chocolate)

3. Set aside in a bowl, clean out Thermomix jug.


Now to put it all together. 

I put a handful of blueberries in each dish...


...added a good sprinkle of chocolate blueberry almond dirt...


...then poured over the chocolate mousse. I put all the dishes on a tray in the freezer so they'd set while we ate dinner. When it was time for dessert, I got them out (they were perfectly set - took about an hour), sprinkled each one with chocolate dirt, and topped them with a blueberry each.


So, so good.

My brother told his friend (who was having dinner with us) that my desserts are 'so healthy you can eat them for breakfast'! Which I think scared his friend a bit, and he said he really wasn't very hungry... but after tasting it he must have changed his mind, because the whole thing disappeared quite quickly!

And I'm not so sure about this one being healthy enough for breakfast - it might be a bit rich with the Lindt chocolate and all. But I think if I found one hiding in the fridge tomorrow morning I would try my best to eat it. :D

Minggu, 03 April 2011

Princess Sorbet... and Dreamy Dragonberry Delight!


'Princess Sorbet' ~ Dragonfruit & Lime

All princesses deserve 'fairy tale' food ~ 
and what could be more 'fairy tale-ish' than dragonfruit? 


The colour and texture of this fruit are enough to delight any princess, but with your trusty Thermomix you can magically transform it into a jewel-coloured sorbet, or a delightful, dreamy dessert! Your little princess is sure to be enraptured!


Dreamy Dragonberry Delight ~ Dragonfruit & Strawberry

What princess could resist this amazingly dreamy Dragonberry Delight?
(Actually, not even dragon-slaying boys can resist this one, 
even if it IS hot pink!)

Princess Sorbet 
(Dragonfruit & Lime)

1. Place lime zest and Rapadura into Thermomix bowl and grind on speed 9 for 30 seconds:
- zest of 1-2 limes (depending how 'zingy' you want it)
- 90g Rapadura

2. Add lime juice, dragonfruit & first batch of ice and grind on speed 9 for 10 seconds:
- juice of 1 lime
- 200g fresh dragonfruit
- 350g ice

3. Add second batch of ice and egg white, and grind on speed 9 for about 1 minute, using spatula to push ice onto blades:
- 350g ice
- 1 egg white

Dreamy Dragonberry Delight
(Dragonfruit & Strawberry Fruity Dream)

1. Place frozen dragonfruit into Thermomix bowl and grind on speed 9 for 20 seconds, helping it along with spatula:
- 350g frozen dragonfruit (chopped into small pieces)

2. Add strawberries and lemon juice, and grind on speed 9 for 20 seconds, until all the fruit is finely ground:

- 250g frozen strawberries
- juice of half a lemon
[Note: you can use any combination of dragonfruit & strawberries, just so it adds up to 600g]

3. Add honey & egg whites, insert butterfly, and whip on speed 4 for 4 minutes:
- 60g - 80g raw honey
- 2 egg whites


How's that for a snack fit for a princess!

Jumat, 10 Desember 2010

Christmas Cooking - Torte Caprese


Here's an idea for dessert for your Christmas party... 
Bake a Torte Caprese, 
and drizzle it with chocolate!


You can find the Torte Caprese recipe in the 
Thermomix Everyday Cookbook.
It's a delicious, gluten free, flourless cake made with 
almonds and chocolate,
and it only takes about five minutes to throw together!
I used my Thermomix to grate the chocolate, 
grind the nuts, and mix the batter for the cake; 
to make the nut butter and chop the almonds for the berry nougat, 
and mix it together;
and to melt the chocolate for drizzling over the top.


Yum!

Selasa, 07 Desember 2010

Berry Nougat with Raw Cacao Nibs


This recipe is an old favourite of ours from the raw food cookbook "Rejuvenate Your Life" by Serene Allison, except with a couple of tweaks of my own. I've added raw cacao nibs, for a delicious, chocolatey crunch, and I use my homemade nut butter. I make this quite often for snacks, desserts, cake toppings, and even for breakfast... it's delicious. The amounts can vary to taste, so don't stress too much about measuring. I make my own nut butter first in the Thermomix - it's very quick and easy.  Otherwise you can use bought almond butter if you like.

You can let the berry nougat thaw a little before eating, or have it still frozen - I like it about halfway in between frozen and thawed, as it's juicier and has more flavour. You can keep it in the freezer and just thaw it out a little when you want some. It's delicious on it's own, or on top of a raw cheesecake or a chocolate gateau or torte caprese - especially with chocolate drizzled over the top!

Recipe makes a little over 4 cups.


1. In Thermomix bowl, chop almonds on speed 6 for about 5 seconds, or until roughly chopped:
- 100g raw almonds

2.  Add and mix on speed 3 for a few seconds, until combined:
- a couple of heaped tablespoons of almond butter (or mixed nut butter) (to 'glue' it together)
- a handful or two of raisins or sultanas (for chewiness)
- 30g pure maple syrup
 (to taste - make sure it's still tangy, not too sweet)
- a handful of raw cacao nibs


3.  Add and mix in on reverse speed 2 for a few seconds:
- about 400g of frozen mixed berries
 

Sabtu, 02 Oktober 2010

Naturally Sweetened Strawberry Jam


Interested in a delicious, naturally sweetened jam 
that only takes 8 minutes to make?  Well, here it is!

For a long time I couldn't bring myself to make jam - it just uses so much sugar and is sickly sweet (and as you've probably figured out by now, I don't like refined sugar)!  
I'd heard that if you wanted to use a natural sweetener (or no sweetener) to make jam, you needed apple pectin (which I couldn't find anywhere) or you could make your own from apples (which I couldn't be bothered doing)...  Then I found a jam recipe in the "My Way of Cooking" Thermomix cookbook that solved the problem for me!  Amongst the variations listed, it said you could use honey or other sugars, or even no sugar, if you used *agar-agar powder.  Yippee!!  I immediately made about four batches of apricot and honey jam with some organic apricots I had in the freezer, and it was lovely... The only problem was I made too much at once, and it didn't keep well in the cupboard - a lot of it went mouldy, despite being in sealed jars.  This is because the sugar in the jam is what preserves it, and the small amount of honey I used just wasn't enough.  

So I learnt my lesson, and now I only make small batches at a time (500g of fruit), and keep them in the fridge.  When jam only takes eight minutes to make, it really isn't a hassle to make some whenever you need it.  (If you have an abundance of fruit, you can prepare it and freeze it in 500g amounts, ready to thaw and make jam when needed.)  

The strawberry jam in the photo above was made just before some visitors arrived - I whipped up some spelt scones in the Thermomix, popped them in the oven, and the jam was ready by the time the scones were cooked.  It was still hot and a bit runny when the visitors arrived, but we didn't mind - we just spooned it over the scones and it tasted delicious!  After about an hour in the fridge the jam was nice and firm (see photo above).  I love the way the natural flavour of the fruit shines through in this jam - it doesn't taste like flavoured sugar, it tastes like strawberries!  The only problem is that you may not be able to stop eating it - we ate the whole batch in one day - half of it on scones, and the other half on a strawberry shortcake.  :)

You can of course use any fruit you like - for 500g of fruit, add 100 - 200g of Rapadura or honey (to taste) or you could just use a pinch of stevia or some xylitol - or no sweetener at all!  Some fruits also need a squeeze of lemon juice to add some tartness.  

* You can buy agar-agar in small packets from health food shops, and the health food section of some supermarkets, but it's a lot cheaper if you buy it online. The cheapest I've seen is from Wheat Free World.  You can also buy apple pectin online, but after looking at the ingredients, I'd rather use agar-agar anyway.


Strawberry Jam

1.  Before you begin, place a saucer into the freezer for testing the jam on.  Wash out your jam jars thoroughly with warm soapy water and rinse well.  Set aside.

2.  Place fruit in Thermomix bowl and chop roughly on speed 4 for 3-5 seconds, depending how chunky you want it:
- 500g strawberries (or other fruit)

3.  Add and cook 8 minutes, 100 degrees, reverse, speed 2:
- 150g Rapadura (or other sweetener)
- 1 level teaspoon agar-agar powder
(If you prefer your jam smooth and un-chunky, cook without the reverse, and puree on speed 8 when you're done.)

4.  Test if the jam is set by placing 1/2 tsp of jam onto the cold saucer.  When it is cool, push it with your finger.  If the jam wrinkles, it's ready.  If not, add a pinch more agar-agar, cook for another 2 minutes, then re-test.

5.  When jam is set, pour into 2 hot rinsed jars with twist-off lids and close immediately.  Turn jars upside down for 10 minutes.  Your jam will keep in the fridge for up to one month.

********


Don't you love how simple it is?  I'm so glad I can make my own, healthy jams now with seasonal fruits, instead of buying the commercial, over-priced, naturally-sweetened jams!

Leave a comment and let me know what variations you try and what you like best!

Sabtu, 11 September 2010

Raspberry Lemonade


My 'baby' just had her seventh birthday today, and she had a great time with her friends, dressing up as princesses and generally having a princessey time!  This is the special party drink I came up with for her, instead of sugary softdrink - the girls loved it!

1. Grind up in Thermomix bowl on speed 9 for 30 seconds:
- 100g Rapadura (or raw sugar)

2.  Add raspberries and ice, and grind up on speed 9 for 30 seconds or so until you get a bright red paste, using the spatula to push the ice onto the blades:
- 180g frozen raspberries
- a couple of handfuls of ice cubes
- a pinch of powdered stevia (optional)

3. Add lemons and water, lock lid, and press the Turbo button a few times to chop roughly:
- 2 lemons (scrub the skins, cut off thick ends & discard, and quarter - no need to peel!)
- 500g water

4. Unlock and open lid, and push the strainer basket down (carefully) into the juice.  Using the spatula to hold the basket in the Thermomix bowl, tip the juice into a large jug.  Leaving strainer basket in bowl, pour in half the soda water, swish around and strain out again into the jug, then add the rest of the soda water to the jug and stir gently:
- 1.25 litres soda water


Bliss!

Kamis, 02 September 2010

Raw Creamy Strawberry Pudding


This is the most DELICIOUS pudding ever - and it's so healthy!  Ruth over at the Thermomix Forum converted it from a recipe in the book Baby Greens: A Live-Food Approach for Children of All Ages.  Thanks Ruth!!  It's kind of like a mixture between a pudding, and strawberry yoghurt.  You can freeze the strawberries to make it thicker and colder if you like, or just use them fresh.  If your kids don't like avocado, just don't tell them it's in there, and they'll never notice - mine didn't ;) 

1.  Soak dates overnight in water, or at least for a few hours until soft:
- 1/2 cup pitted dates
- 1/2 cup water

2.  Place in Thermomix:
- soaked dates with soaking water
- 1 cup of avocado (about 2 avocados)
- 1 1/2 cups of strawberries (I just used 1 punnet) - either frozen or fresh

3.  If using fresh strawberries, blend on speed 5 for 30 - 50 seconds.
     If using frozen strawberries, blend on speed 9 for 30 - 50 seconds.

Enjoy!