Tampilkan postingan dengan label rice/almond milk. Tampilkan semua postingan

Rabu, 19 Oktober 2011

Quick Quinoa Granola


I got up this morning to hungry kids and nothing much to eat, so I made a quick batch of quinoa granola with some quinoa flakes I picked up at the supermarket yesterday. It was so easy and delicious, I just had to share it with you all! While it was toasting I made a banana & chia seed custard (no eggs or dairy) to have with it - but I'll save that for the next post.

Making granola is not an exact science. Just throw in handfuls of your favourite ingredients and spices, drizzle over some oil or melted butter plus honey or syrup, sprinkle with salt, mix it up, and toast it. Mine is a little different every time. I just made a small batch this morning, mixing it straight on the baking tray - if you want to make a big batch, mix it in a large mixing bowl and adjust amounts to suit.

So here's a basic recipe for a quick quinoa granola that you can mix up in seconds, toast in minutes, and enjoy before dashing out the door for the day. Tweak to your heart's delight! :)

Preheat oven to 180 degrees. OR you can toast this under the grill for quicker results, but you'll have to watch it closely and stir it every couple of minutes.

Okay, just throw all these ingredients together, either straight onto your baking tray, or in a mixing bowl:


- 3 big handfuls of quinoa flakes. (If you like you can mix with some rolled oats to save money)

- a handful or two of roughly chopped almonds or other nuts, eg. pecans, hazelnuts (chop in Thermomix on speed 5 for a few seconds) If you can't have nuts just add more seeds.

- a couple of handfuls of sultanas (or other dried fruit)

- a handful of sesame & sunflower seeds (or other seeds, like chia)

- a pinch or two of celtic sea salt or himalayan salt (I like to use a flaked or roughly ground salt to get that occasional slightly salty crunch in my granola)

- a big pinch or two of ground cinnamon

- a smaller pinch of ground nutmeg

[Note: Try grinding up your own nutmeg and a cinnamon quill in the Thermomix for more flavour!]

- a good drizzle of melted coconut oil or butter (I don't measure, I just add more as I'm mixing if I think it needs to be 'wetter'. It depends on how crunchy you like it. More oil, crunchier granola.)

- a good drizzle of raw honey or pure maple syrup or agave syrup (again, I don't measure, just drizzle some over)

- a splash of vanilla extract

Now for the fun bit - get your hands in there and mix it up! Use your fingertips to rub the oil and honey/syrup into the dry ingredients, until it's evenly mixed. Spread out evenly on the tray.


Pop it into the hot oven (180 degrees) and cook for about 10 minutes. Remove from oven, stir with a fork, place back in oven and give it another 5 minutes or so.

I don't even bother letting it cool - just dig in! But if you want to cool it first you can - it gets crispier as it cools.


Sprinkle your granola over some fruit and/or yoghurt. If you're dairy free, try this coconut milk yoghurt!

It's also great sprinkled over banana or vanilla custard.

And of course, it's delicious with cold rice-almond milk or cashew milk too.

My favourite time to eat granola is actually supper time... think I'll go have some now! :)

Selasa, 06 Juli 2010

Creamy Chicken & Brown Rice Soup


This is a very filling soup that my family love - great for a quick winter meal.  Serve with some fresh bread and a green salad, and it will feed about six people for a main meal.  The soup becomes quite thick as it cools down, and could be thinned down a little more with some rice-almond milk if you like.  (We like it thick.)

If you have a big family, or like more veges in your soup, you can add more chicken to the soup (leaving the peas out) and cook at Varoma temperature with the peas and other veges steaming on top. Place the steamed veges in individual bowls and spoon the soup over the top.


1. Grind rice in Thermomix bowl for 1 minute on speed 9. Add almonds and grind 20 secs on speed 9, or until fine. Set aside.
- 50g of raw brown rice
- 50g raw almonds

[Note: raw cashews can be used instead of almonds for a smoother soup]

2. Place onion, garlic cloves, celery and carrot in bowl and chop for 3 seconds, speed 5.  Add oil (or butter) and cook for 3 minutes, 100 degrees, speed 1.
- 1 onion, halved
- 2 garlic cloves
- 1 stalk of celery, quartered
- 1 large carrot, quartered
- 30g olive oil or butter

3. Add chicken and cook 3 minutes, 100 degrees, speed 1.
- 300g cubed chicken

4. Add water, stock paste, rice, and ground rice and almonds, and cook for 30 minutes, 100 degrees, reverse, speed 1.
- 1 litre water
- 2 Tblspns chicken stock paste (made in TMX - see below) or vege stock paste
- 100g raw brown rice
- ground rice & almonds

5. Add parsley and peas, cook another 5 minutes, 100 degrees, reverse, speed 1. Adjust seasonings if needed, and serve.
- handful fresh parsley, chopped
- 100g frozen peas

[Note: if you like it saltier, just add another spoonful of stock paste.  If you're using bought stock powder, you may want to add some tamari for extra flavour.]

Chicken Stock Paste

To make the stock paste, mince up 300g of raw chicken.

Add 300g veges (leek/onion/shallots, carrot, garlic, celery, celeriac - your choice), and a few sprigs fresh herbs (rosemary, thyme, parsley). Chop for 10 seconds on speed 5.

Add 150g coarse sea salt, 1 bay leaf, 50g white wine (or 1 tsp of apple cider vinegar), 1 clove and 5 coriander seeds (or a dash of ground cloves and a dash of ground coriander).

Cook for 20 mins, Varoma temp, speed 2, with simmering basket on top instead of cap.

Replace cap and blend 1 minute, speed 10.

Use 1 tsp in 500g water for chicken stock.

Selasa, 03 November 2009

Apple-Oat Fritters


I made these fritters for breakfast this morning (seeing there was no bread left and I hadn't gotten around to making any buckwheat granola...) - they were very yummy and filling! And the recipe made heaps, so there's plenty for snacking on later. (So if there's only one or two of you, I suggest halving it!) For best results, (and to make the grains easier to digest), start the night before and use the 'pre-soaked version'.

I just used a basic pancake recipe and added grated apple, oats, cinnamon and apple juice concentrate. If you're gluten free you can use gluten free flour and quinoa flakes intead of the oats. Add more or less milk, depending on whether you prefer them thicker or thinner.


Pre-soaked version:
Mix the flour, oats, rice/almond milk and vinegar in the Thermomix and leave to soak overnight. The next morning, add the apples and walnuts and chop speed 5 for 3 seconds, then add remaining ingredients and mix on reverse speed 2 until well mixed.


1. Grate in Thermomix, speed 5 for 3 seconds (or by hand):
- 4 apples, peeled, cored and quartered
- a handful of raw pecans/walnuts (optional)

2. Add rest of ingredients and mix on reverse speed 2 until well mixed (may need to use spatula to help it along):
- 250g spelt flour (mixture of plain & wholemeal; or gluten free flour)
- 100g rolled oats (or quinoa flake for gf)
- 2 tsp baking powder
- 1/2 tsp baking soda
- 1/4 tsp fine sea salt
- 2 tsp cinnamon
- 2 large eggs
- 350g rice/almond milk
- 1 tsp apple cider vinegar
- 2 Tblspns extra virgin olive oil
- 2 Tblspns raw honey
- 2 Tblspns apple juice concentrate (optional - sweeten to taste)

2. Melt a tablespoon of ghee or coconut oil in frying pan and cook fritters over low heat, turning over when starting to bubble. I add a little ghee/oil between each batch, as it makes the outside crispy - yum!


3. Serve plain, or drizzled with a little apple juice concentrate or pure maple syrup.

Senin, 28 September 2009

Dairy-Free Spelt Scones


Scones have always been a 'staple' of our diet - we have them for breakfast or morning tea at least once a week. They're so quick and easy (pop them in the oven and they're ready to eat by the time you've had a shower)... And they are equally nice with jam and cream, or avocado, salt and pepper! (I never put sugar in my scones, so we can eat them with either savoury or sweet toppings.) We also like them with 'Eggs-a-la-Goldenrod' (chopped boiled eggs in white sauce), or white sauce with mince (ground beef). (I know, we have strange things for breakfast!)

Anyway, when I decided to go completely dairy-free for six months, the thing I missed most was butter in and on my scones - lots of it! Sigh. But I found that you can make really nice scones with oil instead of butter, and I'm enjoying them again for breakfast... often with fruit spread and cashew cream, as in the photo above. Yum!

(This recipe is written for Thermomix, but can be easily done by hand too.)
1. Preheat oven to 220 degrees.

2. Weigh into Thermomix bowl and mix for 6 seconds, speed 6:
- 440g plain spelt flour (grind up to 200g of the flour from spelt grain first if you want wholemeal)
- 4 tsp baking powder
- 1/2 tsp fine sea salt

3. Add oil and mix in for a few seconds on speed 5:
- 60g macadamia oil, or light olive oil

4. Add and mix for 5 seconds on speed 5, or until dough almost comes together:
- 230g rice-almond milk, or other milk substitute
- 1 tsp apple cider vinegar (optional)

5. Set dial to closed-lid position and mix for 20 seconds on interval speed. Dough should be soft and slightly sticky - adjust flour and milk if needed.

6. Turn out onto lightly floured bread mat and pat into 3cm thick round. Cut scones out with the MC (cap in the top of the Thermomix lid), dipping it into flour after each one. Place onto floured/greased tray so that scones are touching each other. Cook in hot oven for about 15 mins, or until scones are lightly browned, and cooked through (pull centre ones apart to check).

Kamis, 20 Agustus 2009

Chocolate-Filled Steamed Buns with Cherry Sauce


How's this for decadent, delicious and divine???


It is so quick and easy, and very, very yummy! If you love chocolate, cherries and bread, you'll love this! I learnt to make this at my Varoma training yesterday, and came home and made it again (my own, quirky way) for the family - they loved it. In fact, the leftovers kept calling us this morning, so we ate them for breakfast! (Hee hee) Don't worry, we had scrambled eggs with mince and mushrooms first, so we didn't only eat sweets. (Our meals tend to get a little back to front when my DH is working night shift!)

This recipe is adapted from the "Chocolate Yeast Dumplings with Cherry Sauce" recipe in the Thermomix Varoma cookbook... I just 'tweaked' it to make it more allergy friendly. (For those who don't have a Thermomix, the Varoma is a steamer - maybe you can figure out how to make it in a vege steamer - I'm not sure.)

1. Grind spelt for 1 minute on speed 9:
- 100g spelt grain

2. Add, and mix for 6 seconds on speed 6:
- 1 sachet (1 Tblspn) instant yeast
- 30g honey
- 400g unbleached plain spelt flour
- 1/2 tsp fine sea salt
- 1 egg
- 30g macadamia oil (or ghee/butter)
- 200g rice/almond milk (or water)

3. Knead for 2 minutes on interval speed, adding more flour if needed. (Poke dough - if it's too sticky add some more flour through hole in lid while mixing.)

4. Leave the dough in the bowl and let it rise until doubled. Knead again on interval speed for a few seconds, then take dough out of bowl and divide into 16 pieces. Flatten each piece into a rough circle with hands (about 1 cm thick), and place a piece of chocolate in the middle of each one, folding dough around it to form a little bun:
- 16 fat squares of dark chocolate (you can use any chocolate you like - I prefer Lindt 70% cocoa as it's dairy free)

5. Place the buns in buttered/oiled Varoma bowl and tray, leaving some space between them so they can spread out. Leave them to rise a little for 10 minutes or so.

6. Pour room temperature water into Thermomix bowl, place Varoma on top, and steam for 20 minutes, Varoma temperature, speed 1:
- 500g water
Check to see if buns are cooked - add a bit more time if not. Note: Be careful when removing the Varoma lid - angle it away from you so the steam doesn't burn you, and remove it so the condensation doesn't drip down onto the buns.

7. Set Varoma aside, empty water out of bowl, and place in bowl the sauce ingredients:
- 1 jar pitted sour cherries (about 700g)
- 15g corn starch
- 30g Rapadura

8. Blend for 10 seconds, speed 4 for a chunky sauce, or 15 seconds, speed 8 for a smooth sauce. (Sometimes some pits are still in the cherries, so if you hear any in there, turn speed down and just mix briefly. You can continue with recipe, and pick them out when serving it up.)

9. Place Varoma back on top (to keep buns warm), and cook sauce for 8 minutes, 100 degrees, speed 2.

10. Serve buns topped with cherry sauce while hot.

I dare you to try and just eat one! :)

Rabu, 19 Agustus 2009

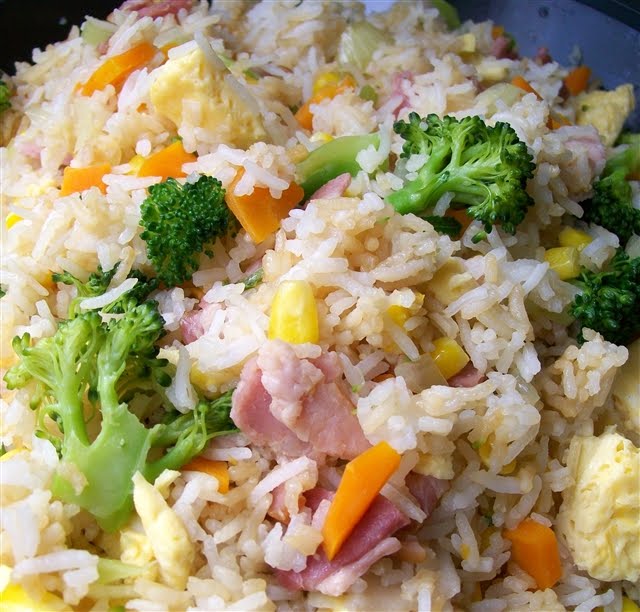
Thermomix 'Fried' Rice


This is a very easy, quick and healthy way to make a big batch of fried rice. It easily feeds our family of six, with leftovers. The rice, veges and egg are actually steamed - no oil is needed. You can use basmati rice and it will cook in about 20 minutes, or with brown rice it will cook in 35 minutes. And you don't have to stand there stirring! Thanks to my friend Nancy for teaching me this method years ago with bacon and veges - there's lots of possible variations, so be creative and make up your own versions too. You can use as much meat and veges as will fit in the Varoma - I've just given some suggestions, not definite amounts.

1. Place rice basket into Thermomix bowl, and weigh in:
- 400g of raw rice (or less if you want a smaller batch).

2. Remove basket, and pour into bowl:
- 400g coconut milk
- 500g water (for white or basmati rice) / 700g water (for brown rice)

3. Rinse rice under tap, then place basket back in bowl. Fasten lid onto bowl, place Varoma on top, and start cooking - Varoma temperature, 20 mins (white) or 35 mins (brown), speed 4.

4. While rice begins cooking, chop up meat and/or veges, placing it into the Varoma as you go.
(I do it this way, as it's quicker than preparing it all then starting the cooking. I put each ingredient in as it's prepared, replacing Varoma lid each time - meat, then hard veges, then quicker cooking veges - that way the hard and soft veges and the meat are all finished cooking at the same time.)

5.  Place the cubed meat in the bottom of the Varoma in a single layer, then top with the preferred veges:
- 100g - 200g of cubed chicken or fish and/or prawns (you can marinate it for a little while first in some soy sauce, curry powder, garlic, ginger, and honey, or whatever marinade you prefer)
  (or some chopped bacon, preferably organic)
- 1 sliced onion/shallots/leeks
- carrots, sliced or julienned
- celery, sliced
- kohlrabi, thin strips or julienned
- broccoli/cauliflower florets
- cabbage, shredded
- spinach/silverbeet, sliced
- frozen peas & corn
- cashews or slivered almonds (opt.)

6. Line the top Varoma tray with a piece of wet baking paper, and pour in:
- 4 to 5 eggs, whisked
Replace lid, and leave to steam.

7. Check meat, veges, egg and rice after 20 mins to make sure they're all cooked. (With basmati rice, it's generally cooked after about 17 minutes, but I just leave it for the full 20, and everything's usually done by then. With brown rice, just add the veges when there's only 15 minutes left to go, and add the eggs when there's 5 minutes left, and they should be done at the same time as the rice that way.)

8. Remove Varoma and place lid underneath.  Remove rice basket using spatula, and tip rice into Varoma bowl.  Add the meat and veges. Slice the egg up in tray (see photo) and tip into Varoma bowl with rice.  Season with some tamari sauce / soy sauce / sweet chilli sauce, mix together gently, and serve!


Slice egg in the tray and add to rice and veges.


Serve fried rice in the Varoma bowl with the lid underneath to catch any drips.

Rabu, 12 Agustus 2009

Fruit-Filled Breakfast Brioche


This morning I made a filled brioche for breakfast. There's nothing like steaming hot fruit encased in a sweet bread to make the kids get out of bed! It was supposed to be filled with the leftover cooked apples and cinnamon I had in the fridge, but when I went to get them, they were gone... (My kids love cooked apple - they eat it on toast.) So in the absence of anything else, I used a tin of peaches. It was still yummy!

This is an easy breakfast if you're an early riser - it took an hour and a half from beginning to end (but only about 10 minutes of actual work). If you're not an early riser, have it for morning or afternoon tea! (I use my Thermomix, which makes it very quick. If you have to make it by hand it will of course take longer.)

1. Place in Thermomix bowl and mix for 10 seconds, speed 6:

- 400g unbleached plain spelt flour

- 2 tsp (or 1 sachet) instant dry yeast

- 60g honey

- 40g oil (or butter)

- 1 egg (optional)

- 1/2 tsp fine sea salt

- 150g rice/almond milk (or other milk) (approx. - check as you mix to see if you need more milk or more flour)

2. Mix on interval speed for 3 minutes, wrap in breadmat (or place in oiled bowl and cover), and rise in cold oven for 20 - 30 minutes with a shallow pan of boiling water in the bottom of the oven to create steam.

3. Remove from oven and roll dough into a circle, about 1 cm thick. Place dough on pizza tray lined with baking paper. Spoon cooked/tinned fruit onto centre of dough, and fold dough over it into the centre, leaving a hole so you can still see some of the fruit.

4. Place tray back in cold oven and turn it on to 180 degrees C (less if fan-forced). (Leave the pan of hot water in the oven.) Leave to rise and bake for about 25 minutes, checking towards the end and turning tray so it browns evenly. May need a little more time - lift brioche up a little to check if it's browned underneath.

5. Slip onto a large plate, slice like a pie, and serve hot!


Selasa, 11 Agustus 2009

Sunny Scalloped Eggs & Broccoli (or Silverbeet)


This is an easy, light meal that is handy for using up all that lovely fresh broccoli or silverbeet that's in season right now. We like it for lunch, as it's got lots of protein from the eggs and the broccoli/silverbeet, and protein is very helpful for keeping you awake and energised! We're dairy free, so I make my own rice & almond milk, which saves us lots of money, but you could use regular milk if preferred. We're getting lots of eggs from our chickens right now as well, so all round, this is an very inexpensive meal for us. Serve with raw vege sticks.

1. Chop up and place in Varoma
- 2 cups of broccoli (or silverbeet)

2. Place in steamer basket in bowl:
- 6 eggs
Fill bowl with 500g water. Put on the lid, and place Varoma on top.

3. Steam eggs and broccoli (or silverbeet) for 15 mins, Varoma temperature, speed 1. (If the veges need more time, take the eggs out, and keep steaming until done.) Tip water out of bowl, set eggs aside.

4. Add to bowl, and chop for 5 seconds on speed 5:
- 1/2 onion
- 1 stick of celery, quartered
- a few mushrooms (optional)

5. Add oil and saute for 2 minutes, 100 degrees, reverse speed 1:
- 20g olive oil

6. Add remaining ingredients and cook for 7 minutes, 90 degrees, reverse speed 3:
- 500g rice/almond milk
- 4 Tblspns plain flour (I use spelt, but rice or other flour would work)
- 1 tsp sea salt (or to taste)
- pepper

7. While white sauce is cooking, peel eggs and slice in half. In a baking dish, spread greens, then place eggs on top in two rows. When sauce is cooked, pour and spread over eggs.

8. Without cleaning out bowl, add and mix on speed 6 for a few seconds until made into crumbs:
- two pieces of wholemeal bread (use your day old bread that's getting a bit dry)
- 2 tsp of olive oil or butter
- a handful of fresh parsley

9. Sprinkle crumbs over white sauce. Place casserole dish under hot grill to brown slightly, and serve.

Kamis, 14 Mei 2009

Carob Cake with Sugar-Free, Dairy-Free Icing


Hi everyone - I'm finally getting around to posting a recipe! We're actually on holiday at the beach, which is why I've been so slack. This cake can be made with either cocoa or carob (use a little more if cocoa). There's also a couple of suggestions for sweeteners - if you've never heard of Rapadura, see here. I sometimes use butter, sometimes olive oil, sometimes coconut oil - you can substitute it for whatever you usually use. You can make it either with spelt or gluten free flour (or wheat of course, but I don't use wheat).

I use grams for most of my measurements (because the Thermomix has a built in scale, and that's how you cook with it), so I've converted them to ounces as well, but not to cups - sorry!

The icing (frosting) is really yummy, and so healthy! If you can't have soy, maybe you know of another type of carob buttons you could use. I've suggested a recipe for homemade soy-free carob chips here (with comments).

If you'd like some carob 'candy' recipes, my friend Angie has a website with some: there's Carob Candy Squares, Carob Sesame Balls, Carob Fruit Candy (contains milk powder, but you could substitute with soy milk powder), and Carob Clusters. Yum!

Happy baking!


Carob Cake
1. Pre-heat oven to 180 degrees. Grease / line a 20cm square pan or small ring tin.

2. Melt butter/coconut oil (Thermomix: 2 mins, 60 degrees, speed 4):
- 120g (4.25 oz) butter (or oil)

3. Mix together all ingredients (including melted butter/coconut oil) in Thermomix or food processor for 30 seconds (speed 5 in Thermomix, med-high speed in food processor):
- 100g (3.5 oz) rice-almond milk
- 2 eggs
- 1 tsp vanilla extract
- 150g (5.3 oz) spelt flour (or 120g (4.2 oz) gluten-free flour)
- 4 level tsp baking powder
- 30g (1 oz or about 3 heaped Tablespoons) carob powder
- 100g (3.5 oz) raw honey or 120g (4.2 oz) Rapadura or 60g (2 oz) Rapadura + pinch of Stevia powder

4. Pour into cake tin and bake in centre of oven for 25 - 30 mins, or until knife inserted in cake comes out clean.

5. Eat warm, dusted with powdered Rapadura, or cool and top with carob icing.


Carob Icing (Frosting)
(based on one from the Fit for Life Cookbook, Marilyn Diamond)

1. In a saucepan, combine all ingredients and warm over med-low heat while stirring continuously with a wooden spoon (or Thermomix - 2 mins, 60 degrees, speed 2).
- 3 Tablespoons coconut oil or butter
- 1/2 cup carob chips
- 1/4 cup honey (or rice malt syrup)
- 1 tsp vanilla extract

2. Drizzle and spread over cake - it will get firm as it cools.

If you have some left, you can keep it in the fridge and spread it on toast - it's yummy! Try adding crushed hazelnuts for a healthy substitute for Nutella!