Tampilkan postingan dengan label steamed. Tampilkan semua postingan

Kamis, 17 Januari 2013

Spicy BBQ Chicken All-in-One Dinner


One of the things I love most about my Thermomix is that it makes super-delicious and super-easy 'all-in-one' meals! (You may have noticed that. There's quite a few on my blog.)

Who doesn't love a meal that's quick to put together, doesn't use up every pot in the cupboard, saves electricity by cooking everything at once, and tastes delicious to boot? Not to mention the fact that steamed veges are much better for you than veges boiled to death in a pot of water. So I tend to make a lot of these 'all-in-one' meals, just varying the layers to use whatever I have. When the cooking time is finished, if there's liquid in the bowl, I often use it to make a sauce to pour over the top so nothing is wasted.

Here's one I made up the other night - chicken thighs cooking in a spicy BBQ sauce, with veges and either rice, potatoes or quinoa cooking in the basket in the bowl, and a sauce made with the juices that are left in the bowl at the end. Very simple, a great mid-week meal. It's a little bit spicy, so adjust the chilli powder to taste!

Spicy BBQ Chicken All-in-One Dinner

1. Mince garlic in Thermomix bowl on speed 7 for 3 seconds:
- 2 cloves garlic
 
2. Add remaining sauce ingredients and mix on speed 5 for 10 seconds:
- 60g apple cider vinegar
- 30g butter, ghee or oil
- 2 tsp seeded or Dijon mustard
- 2 Tbspns Tamari
- 2 Tbspns lemon juice
- 20g Rapadura or 15g honey
- 1 tsp herb salt
- 1-2 tsp chilli powder
- 2 tsp smoked paprika
 
3. Pour over chicken thighs in a bowl and marinate for half an hour. (If you don't have time you can just go ahead and cook them.)
- 1 kg chicken thighs, fat removed
 
4. Pour water into bowl, insert rice basket, and weigh in rice/quinoa/potatoes.
- 900g water
- 400g basmati rice
    OR
  350g quinoa (rinsed)
    OR   
  fill basket with thickly sliced potatoes (skin on)

5. Put lid on bowl, with Varoma on top. Add veges to lower Varoma tray, and place the upper Varoma tray on top. Line with wet baking paper, and arrange chicken on paper, drizzling with some of the sauce. Set remaining sauce aside for later.
- sliced veges: carrots, broccoli, green beans, red capsicum... or even just frozen peas and corn if you're in a hurry
- chicken in BBQ sauce


6. Start cooking for 20 minutes at Varoma temp, speed 4 for rice or quinoa, or 25 minutes for potatoes. When cooking time is finished, remove Varoma (set it on it's lid to catch drips) and remove rice/quinoa/potatoes and cooked veges to a Thermoserver or covered serving dish to keep warm. The chicken will need a little more time to cook.

7. If you cooked rice/quinoa, there won't be much 'juice' left in the bowl. Add some more liquid by carefully draining the juices off the chicken into the bowl. Also, add the reserved BBQ sauce to the bowl (from marinating the chicken). Replace lid and Varoma (bottom tray will be empty), and cook for another 10 minutes at Varoma temperature, speed 2. Chicken should be done - cut a thigh in half to check.

    If you cooked potatoes in the basket, there'll be lots of water left in the bowl. Tip all but about 2 inches of water out. Add juices from chicken and reserved sauce, replace chicken in Varoma tray, and cook as above.

 
The juices left in the bowl - BBQ marinade is added and it is thickened to make sauce.

8. Remove cooked chicken to another Thermoserver or covered serving dish. Make the sauce by adding cornstarch/arrowroot mixture to bowl and cooking at 100C for 4 minutes, speed 4.
- 2 Tbspns cornstarch or arrowroot, mixed with 2 Tbspns water in a cup


9. Serve chicken, veges and rice/quinoa/potatoes together, drizzled with the sauce.
 
As you can see, it's very handy to have more than one *Thermoserver!
They'll keep your food hot for up to three hours, so you can make dinner ahead of time and keep it in the servers until everyone's ready to eat. No more cold dinners.
 
* A Thermoserver is a double insulated stainless steel serving dish valued at $60, available only through Thermomix home demonstrations in Australia. 
 
* Special Deal for January 2013 *
You can receive TWO Thermoservers for free by purchasing a Thermomix in January,
and holding your home demonstration before the end of February!
Visit the Thermomix website for more details.

Minggu, 01 Juli 2012

Almond, Lemon & Coconut Steamed Puddings {grain free, dairy free}


Today I decided to experiment with a grain free recipe for the steamed lemon and coconut puddings we make at the Thermomix Varoma demos. My daughter absolutely loves those puddings, but she reacts to gluten (and I think grains), and isn't supposed to have all that sugar. There is a grain free version of the puddings on the Varoma recipe cards, but I find that recipe a bit heavy - I wanted them to be lighter, and also dairy free and more naturally sweetened. I was really happy with the result of my experimenting! Anyway, I think I'd better not chit chat too much here and just hurry up and post the recipe... seems like there's a few people on Facebook who want it NOW!! Lol :D So here it is...

1. Peel the lemon zest into the Thermomix bowl with a potato peeler:
- zest of one lemon
    (Make sure your bowl is nice and dry.)

2. Add and blend for 10 seconds on speed 10:
- 100g blanched almonds*
- 40g coconut flour** (not dessicated coconut ground up, it's too oily)
- 40g Rapadura
- 1/2 tsp green stevia powder (or white stevia if that's all you have)

3. Add and mix for another 6 seconds on speed 5:
- 100g macadamia oil
- 2 yolks + 2 eggs (save the whites for fruity dream or sorbet)
- 180g coconut milk**
- 2 tsp baking powder
  Scrape down bowl and reblend for another 5 seconds on speed 5. Don't overmix.

4. Pour batter into silicon cupcake cups (or greased ramekins) and place in two layers in the Varoma trays. (No need to grease silicon cupcake cups.) Rinse out the Thermomix bowl and fill to just above the blades with water (just cool tap water), and place on base with lid on. Place the Varoma on top and cook the puddings for 20 minutes at Varoma temp, speed 2.


(Tip: When you lift the lid off the Varoma at the end of the cooking time,
tilt it back so the steam escapes away from you, and the condensation
on the lid drips down into the vent on the side of the Varoma dish,
and not onto the puddings! Soggy puddings are not so nice.)

5. Set the puddings aside. Tip the water out of the bowl and place back on the base.

6. Weigh into bowl and cook for 2 minutes at 100C, speed 2:
- 50g Rapadura
- 50g pure maple syrup
- 50g fresh lemon juice (approx. 1 lemon)
  Meanwhile, turn puddings out of silicon cupcake cups (or ramekins) onto plates. They come out easiest while warm.

7. Drizzle puddings with a little syrup, top with a raspberry (or some fruity dream), and serve.


* To blanch your own almonds, weigh raw almonds into a bowl, pour boiling water over and leave for about 10 minutes, then the skins will pop off when you 'pinch' them between your fingers. Spread on a tea towel to dry out before grinding.

** If you want to make your own coconut flour, you need to first grind up 100g of dried shredded (or dessicated) coconut, add 300g water, cook for 10 mins at 100C speed 2, then blend for 1 minute on speed 9. Then squeeze through a nut milk bag (when cool enough) until you've got as much moisture out of the coconut as possible. (Use the coconut milk to make the puddings, or in curries.) Spread the coconut out on a dehydrator tray and dry for a few hours until there's no moisture left at all, then grind it up in the Thermomix. If you'd rather the easy option of buying coconut flour, you can get it at health food stores or online. (You can buy it here.) It seems expensive, but you really don't need much to make a cake, so a 500g bag lasts for ages.


Selasa, 25 Januari 2011

Lemon Butter made with Rapadura


Don't you just love homemade lemon butter?  The tangy, creamy, sweetness goes so well with a thick slice of homemade spelt challah, hot out of the oven.  I could eat it all day, and so could my daughter - so I'm posting my healthier version of lemon butter so she can look it up and make it herself without constantly asking me how to do it!  I use a mixture of Rapadura and stevia in place of sugar, and I really love the flavour the Rapadura gives it - a little bit caramelly and not so sweet that the flavour can't shine through.  

It's really quick and easy, so if you get up in the morning and realize there's nothing to have on your toast, you can whip this up in no time at all.  Try it with lime, too - it's really good!  It's also great as a filling for little tarts made with pie pastry.

1.  Grind for 30 seconds on speed 9:
- 60g Rapadura

2.  Scrape down sides with spatula, insert butterfly, and add:
- 1/4 tsp stevia liquid or powder
- juice of 1 lemon
- 80g ghee or butter or coconut oil
- 2 eggs

3.  Cook for 8 minutes, 80 degrees, speed 3.  The lemon butter should be thick enough to coat the back of a spoon.  Pour into a clean jar and keep in the fridge.

I have no idea how long this will last - it never lasts more than a few days at our house, because it goes quickly!

Kamis, 20 Agustus 2009

Chocolate-Filled Steamed Buns with Cherry Sauce


How's this for decadent, delicious and divine???


It is so quick and easy, and very, very yummy! If you love chocolate, cherries and bread, you'll love this! I learnt to make this at my Varoma training yesterday, and came home and made it again (my own, quirky way) for the family - they loved it. In fact, the leftovers kept calling us this morning, so we ate them for breakfast! (Hee hee) Don't worry, we had scrambled eggs with mince and mushrooms first, so we didn't only eat sweets. (Our meals tend to get a little back to front when my DH is working night shift!)

This recipe is adapted from the "Chocolate Yeast Dumplings with Cherry Sauce" recipe in the Thermomix Varoma cookbook... I just 'tweaked' it to make it more allergy friendly. (For those who don't have a Thermomix, the Varoma is a steamer - maybe you can figure out how to make it in a vege steamer - I'm not sure.)

1. Grind spelt for 1 minute on speed 9:
- 100g spelt grain

2. Add, and mix for 6 seconds on speed 6:
- 1 sachet (1 Tblspn) instant yeast
- 30g honey
- 400g unbleached plain spelt flour
- 1/2 tsp fine sea salt
- 1 egg
- 30g macadamia oil (or ghee/butter)
- 200g rice/almond milk (or water)

3. Knead for 2 minutes on interval speed, adding more flour if needed. (Poke dough - if it's too sticky add some more flour through hole in lid while mixing.)

4. Leave the dough in the bowl and let it rise until doubled. Knead again on interval speed for a few seconds, then take dough out of bowl and divide into 16 pieces. Flatten each piece into a rough circle with hands (about 1 cm thick), and place a piece of chocolate in the middle of each one, folding dough around it to form a little bun:
- 16 fat squares of dark chocolate (you can use any chocolate you like - I prefer Lindt 70% cocoa as it's dairy free)

5. Place the buns in buttered/oiled Varoma bowl and tray, leaving some space between them so they can spread out. Leave them to rise a little for 10 minutes or so.

6. Pour room temperature water into Thermomix bowl, place Varoma on top, and steam for 20 minutes, Varoma temperature, speed 1:
- 500g water
Check to see if buns are cooked - add a bit more time if not. Note: Be careful when removing the Varoma lid - angle it away from you so the steam doesn't burn you, and remove it so the condensation doesn't drip down onto the buns.

7. Set Varoma aside, empty water out of bowl, and place in bowl the sauce ingredients:
- 1 jar pitted sour cherries (about 700g)
- 15g corn starch
- 30g Rapadura

8. Blend for 10 seconds, speed 4 for a chunky sauce, or 15 seconds, speed 8 for a smooth sauce. (Sometimes some pits are still in the cherries, so if you hear any in there, turn speed down and just mix briefly. You can continue with recipe, and pick them out when serving it up.)

9. Place Varoma back on top (to keep buns warm), and cook sauce for 8 minutes, 100 degrees, speed 2.

10. Serve buns topped with cherry sauce while hot.

I dare you to try and just eat one! :)

Selasa, 11 Agustus 2009

Sunny Scalloped Eggs & Broccoli (or Silverbeet)


This is an easy, light meal that is handy for using up all that lovely fresh broccoli or silverbeet that's in season right now. We like it for lunch, as it's got lots of protein from the eggs and the broccoli/silverbeet, and protein is very helpful for keeping you awake and energised! We're dairy free, so I make my own rice & almond milk, which saves us lots of money, but you could use regular milk if preferred. We're getting lots of eggs from our chickens right now as well, so all round, this is an very inexpensive meal for us. Serve with raw vege sticks.

1. Chop up and place in Varoma
- 2 cups of broccoli (or silverbeet)

2. Place in steamer basket in bowl:
- 6 eggs
Fill bowl with 500g water. Put on the lid, and place Varoma on top.

3. Steam eggs and broccoli (or silverbeet) for 15 mins, Varoma temperature, speed 1. (If the veges need more time, take the eggs out, and keep steaming until done.) Tip water out of bowl, set eggs aside.

4. Add to bowl, and chop for 5 seconds on speed 5:
- 1/2 onion
- 1 stick of celery, quartered
- a few mushrooms (optional)

5. Add oil and saute for 2 minutes, 100 degrees, reverse speed 1:
- 20g olive oil

6. Add remaining ingredients and cook for 7 minutes, 90 degrees, reverse speed 3:
- 500g rice/almond milk
- 4 Tblspns plain flour (I use spelt, but rice or other flour would work)
- 1 tsp sea salt (or to taste)
- pepper

7. While white sauce is cooking, peel eggs and slice in half. In a baking dish, spread greens, then place eggs on top in two rows. When sauce is cooked, pour and spread over eggs.

8. Without cleaning out bowl, add and mix on speed 6 for a few seconds until made into crumbs:
- two pieces of wholemeal bread (use your day old bread that's getting a bit dry)
- 2 tsp of olive oil or butter
- a handful of fresh parsley

9. Sprinkle crumbs over white sauce. Place casserole dish under hot grill to brown slightly, and serve.

Minggu, 09 Agustus 2009

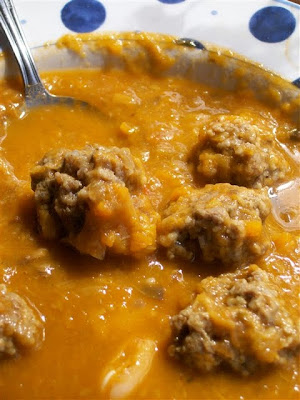
Meatball, Vege & Bean Soup


I made up this recipe today, and it's delicious! (If I may say so myself!) I made it completely in the Thermomix, but if you want to make it on the stovetop, just chop the veges and saute in oil, add stock & water & beans, bring to boil, and drop in meatballs and simmer til cooked. Yum!

1. Grind bread into crumbs and set aside:

- 2 pieces wholemeal spelt/gluten free bread

(Also grind meat into mince if making your own, then set aside.)

2. Place in TMX bowl, and chop on speed 5 for about 5 secs, or until consistency desired:

- 2 cloves garlic
- 1/2 onion
- 1 large leek, chopped in chunks
- 1 carrot, quartered
- 1 celery stick, quartered
- 2 ripe juicy tomatoes, quartered
(or any other combination of veges you prefer!)

3. Add oil and saute at 100 degrees for 5 mins, reverse, speed 1:

- 2 Tblspns olive oil

4. Add and cook for 25 minutes, Varoma, reverse speed 2 (while making meatballs):

- 2 Tblspns vege stock concentrate (or to taste)
- 2 Tblspns tomato paste
- a couple of handfuls sliced mushrooms
- 1 tsp Italian herbs (dried)
- water (up to 2 litre mark)

5. Meanwhile, mix together in a bowl and make into bite-sized meatballs, and place them in the Varoma (both trays) spread slightly apart for the steam to get through:

- 500g beef / turkey / chicken mince
- breadcrumbs
- 1 large egg
- dash each of ground cumin, ground sage, cayenne pepper, oregano, salt & pepper
- dash of tamari sauce
(As soon as they're made, take the MC off the TMX bowl and place the Varoma on top - try and get it done before the steaming begins!)

6. Remove Varoma (put lid underneath to catch drips) and add to bowl:

- 1 tin cooked cannelini beans, drained
- water to top up soup to 2 litres again

7. Replace Varoma, cook for 5 more minutes at Varoma, reverse, speed 1. Make sure meatballs are cooked!

8. Serve soup into bowls, add a few meatballs, and enjoy! (You could sprinkle with some grated parmesan if you can have it.)