Kamis, 06 Desember 2012

Quinoa Salad, Thermomix Style!


Summer. The weather's so hot, the last thing you feel like doing is slaving over a hot stove, cooking. Green smoothie for dinner? Hmmm, don't know about the guys in your house, but mine wouldn't be too happy. What to do? Quinoa Salad! It doesn't take a lot of effort (especially with the Thermomix), you can pretty much chuck in whatever's in the fridge (bonus: it's different every time!), and everyone likes it. (Well, except for the pine nuts in this one - my eleven year old picked those out... Oh well. Can't win 'em all.)


This salad ticks all the boxes - quick, easy, healthy, yummy and there's lots of variations possible. Sometimes I add meat - chicken, tuna, or salmon - sometimes I leave the meat out. Eggs are optional too, but are an easy filler. You can try different dressings - for my quickest of quick versions, I just drizzle over some balsamic vinegar and my specially good extra virgin olive oil that I save for salads, plus a little herb salt. Other times I use my homemade mayonnaise, which is made with seeded mustard, honey, garlic and herbs. Beck from Thermosisters made a version with a dressing consisting of flaxseed oil, garlic, seeded mustard and honey. Yum!

Just a note on quinoa (pronounced 'KEEN-wa'): I've had some people comment that they don't like quinoa as it has a bitter taste. If the quinoa you are using is bitter, it needs to be well soaked and/or rinsed to remove the natural saponins coating the seeds. Quinoa grown in Australia is usually sold un-rinsed, whereas quinoa from Peru or Bolivia is usually pre-rinsed and ready to use. If you have Australian quinoa, follow these guidelines before cooking:
     - Rinse quinoa in a fine strainer for 1 to 2 minutes under running water, the evening before using it, then soak in a bowl of water overnight.
     - In the morning (or before cooking), rinse again under running water for another minute.
If you follow these steps, you shouldn't have a problem with bitterness.

So here's my 'chicken & pumpkin' version of quinoa salad - see what other variations you can come up with.

1. Weigh dry quinoa into a bowl and cover with water, then set aside to soak for 7-12 hours. Drain and rinse in a fine seive under running water. Or, if you're in a hurry, pour boiling water over quinoa and let sit for 10 mins or more, then rinse.
- 350g quinoa, weighed when dry
- 500g water

2. Weigh water into Thermomix bowl, place quinoa in steamer basket and insert into bowl. Place eggs on top of quinoa in steamer basket.
- 800g water
- 4 eggs, preferably organic free range, well rinsed

3. Place the lid on the bowl, with Varoma on top, and place chicken and pumpkin in Varoma dish, leaving some spaces for the steam to get through. Cook for 20 minutes, Varoma temperature, speed 4. (Check chicken and pumpkin in last five minutes of cooking time and break apart with the spatula so it cooks through evenly.)
- 3 chicken thighs, cubed
- 250g pumpkin, sliced thinly (about 5 mm)

4. When the quinoa, chicken & veges are cooked, remove eggs from quinoa (scraping off quinoa from shells) and peel and quarter eggs.

5. Prepare salad ingredients in a very large salad bowl. I like to use:
- a bag of mixed salad greens or baby spinach
- sun-dried tomato strips
- kalamata olives
- thinly sliced shallots or red onion
- boiled eggs, quartered
- cubed sheep or goat milk feta (optional)

6. Add quinoa, chicken and pumpkin to salad ingredients. You can wait until they're cool if you like, or use straight away for a warm salad.

7. Drizzle with balsamic vinegar and a good quality cold-pressed extra virgin olive oil, or whatever dressing you prefer.

8. Sprinkle with toasted seeds and serve. I like a mixture of sesame seeds, sunflower seeds and pine nuts, toasted in a dry skillet until they're starting to pop, then drizzled with tamari and toasted a little longer. They give a lovely 'crunch' to salads.


Another variation we love is smoked salmon, avocado, olive, sun-dried tomato or cherry tomatoes and baby spinach. What variations do you like to make?
Share your versions in the comments below!

Sabtu, 01 Desember 2012

Bolognese Sauce in the Thermomix


I've heard people say they don't like bolognese sauce made in the Thermomix, because it's bland, and turns to mush. Well, I beg to differ. You can't blame the Thermomix for lack of flavour - that depends on what you put in, just as it does when you cook in a saucepan on the stovetop. And if it's the texture that's bothering you, let me reassure you it doesn't have to be 'mush'!

This is basically how I make my bolognese sauce; you can add to or subtract from it to make it the way you like it. You can use lamb, turkey or chicken mince instead of beef if you like. Or if you want a vegetarian version, leave out the meat and add extra veges (eggplant and/or orange sweet potato is nice), and more mushrooms. For a grain free version, serve on raw zucchini 'noodles', or steam thin strips of cabbage in the Varoma while you cook the sauce in the bowl.

If you like, you can mince your own meat first. I find I can often get a bulk rump cheaper per kilo than minced beef, so this is a great way to save money. It also means you can get a 'chunkier' sauce if that's what you want. (And it's also good to know that your mince is just 'meat', and doesn't have lots of fat, gristle and water mixed in to bulk it out... and maybe other hidden additives and preservatives as well!)

To mince your meat: Cut the meat into 2 cm cubes (semi-frozen is easiest), weigh in 300-400g, and mince by setting the speed dial to the closed lid position and pressing the Turbo button 3 or 4 times. This will be chunkier than you probably want it, but remember it will break down a little during cooking.

Serves 6-8.

1. Chop onion & garlic on speed 5 for 3 seconds:
- 1 large onion, halved
- 3 or 4 cloves garlic (to taste)

2. Add oil and cook for 3 minutes at 100C, reverse, speed 1:
- 30g olive oil

3. Add vegetables & herbs and chop roughly - speed 5 for 8 seconds; or chop longer for 'grated' veges:
- 500g vine-ripened tomatoes, halved
- 150g carrots, quartered
- 1 celery stick, quartered (including leaves)
- 100g zucchini, quartered
- half a red capsicum (opt)
- a large handful fresh basil, some fresh oregano & a sprinkle of fresh rosemary
OR 2 tsp of dried Italian herbs

4. Add remaining ingredients and cook for 25-30 minutes at 100C, reverse, speed soft:
- 400g minced beef (or lamb, turkey or chicken)
- 100g thickly sliced mushrooms
- 60g semi-dried tomatoes (opt.)
- 100-150g sliced Kalamata olives (opt.)
- 120g tomato paste
- 1 tsp balsamic vinegar
- 1 Tbspn Rapadura
- 2 Tbspns vegetable stock paste (or a meat stock paste like the one in this recipe)
- 50g red wine or water

While the pasta sauce cooks, I cook the pasta on the stovetop. Or if I'm doing a grainfree version, I use my Benriner to make zucchini 'noodles', or thinly slice cabbage and steam in the Varoma while the sauce cooks. (Use Varoma temp and add 50g more water, cooking for 25 minutes.)

If you're cooking for less people, you can halve the recipe, add 100g water, and after 10 minutes cooking time add 250g raw pasta to the sauce and cook for 8-10 minutes more. (Make sure it's on reverse, or you WILL have mush!)

So there's some bolognese-sauce-making hints - tweak to taste!

Jumat, 23 November 2012

Quick Egg Curry with Quinoa... plus how to make Coconut Milk


This is one of those 'last-minute-slap-dash' recipes that are pretty much my trademark. Sometimes those are the best kind of recipes. Here's how it happened...
 
One dark morning, I stumbled out of bed at 5.30am to try and find something my hubby could take to work for lunch, and there was just nothing. No bread, no leftovers, just a few basic ingredients and some eggs. My fuzzy brain did a quick search and came up with 'egg curry'. I dug through the cupboard looking for the curry powder, but it was all gone. Typical. That'll teach me to menu plan more carefully. Okay, no big deal - I had the basic ingredients for a curry powder and I had a Thermomix! So I revved up Thermie and quickly ground some spices to make some homemade curry powder, using the recipe in the Indian cookbook. (No, the kids didn't wake up - they're used to me Thermomixing at all sorts of odd hours!) Then I made a quick egg curry. Hubby was out the door and on his way by 6am, and I stumbled back to bed.
 
So a month or so ago I shared this simple recipe on Facebook, and was surprised to find that lots of people loved it! I hadn't blogged it because it didn't seem to be anything out of the ordinary... but maybe that's why people like it. It's simple, tasty, quick, and cheap. And really, that's what most of us want for everyday meals - right? Now and then a fancy meal, but mostly it's 'get it on the table and get 'em fed with as little fuss as possible'!
 
Have a look at the variations at the end if you'd rather chicken instead of eggs, or more veges, or a vegetarian version.
 
Quick Egg Curry with Quinoa
 
1. Curry powder: if you want to make your own, do that first. You can of course just use bought curry powder, but homemade has lots of flavour, and no anti-caking agents. The recipe I use is the Madras Curry Powder from the Thermomix Indian Cookbook but I leave the salt out. Or I just use the Garam Masala recipe from the Thermomix Everyday Cookbook - that's nice too, and very simple.
 
2. Coconut milk: if you're not in a hurry and you really want to go back to basics, you can make your coconut milk first. This saves money, and it's very simple. Here's how.

- Grind up 300g dried, shredded coconut for 10 seconds on speed 8 (in the Thermomix). You can use fresh coconut instead if you have it.

- Add 1200g water and cook for 15-20 minutes at 100C, speed 4 - until the temperature reaches 100C. (If using fresh coconut, only add 900g water.)

Blend on speed 8 for 30 seconds; strain through a nut milk bag. (I use tongs to squeeze the milk out because it's hot!)


[Optional: Return the pulp to the Thermomix bowl, add another 1200g of water, and repeat. You'll have a thick milk and a thinner milk. You can either mix them, or just use the thinner milk in smoothies/baking. ]


If you like, you can also dehydrate the pulp in a dehydrator for 6 hours on low temp, then grind it for 2 minutes speed 9 to make coconut flour! But I'm getting off the track here, back to the egg curry...
 
3. Quinoa & eggs: The next step is to cook the quinoa and eggs.
 
Weigh water into bowl:
- 900g water
 
Add rice basket and weigh dry quinoa into basket. (Don't stress if a little bit falls through the holes - not much will.)
- 300g white quinoa
 
[Note: Most of the quinoa I've bought is pre-rinsed, it doesn't have a bitter taste. If it's not pre-rinsed (or you're not sure), rinse well in a fine strainer under running water for a couple of minutes, rubbing grains through your fingers to remove saponins. (That's the natural bug-deterrant on quinoa that makes it taste bitter.) Soaking quinoa: If you're thinking ahead, you can weigh the dry quinoa into a Thermoserver or other dish, cover with water and a tsp of apple cider vinegar, and leave to soak over night or for a few hours.]


Wash eggs well and place on top of quinoa, in the rice basket:
- 6 eggs, organic free range
 
[OR place the eggs in the Varoma if you don't like the idea of them being in with the quinoa. But it's perfectly fine, as long as the eggs are clean. Some people grind up eggs shells and add them to food for a calcium supplement - egg shells are non-toxic!]
 
Cook for 20 minutes at Varoma temperature, speed 4.
 
 
Remove eggs from quinoa with tongs (scrape off the quinoa) and set aside. Tip quinoa into Thermoserver or covered serving dish to stay warm. Rinse & dry bowl.
 
4. Curry sauce: (don't worry, this is quick!)
Chop onion, garlic and coriander in Thermomix bowl on speed 5 for 3 seconds.
- 1 brown onion, halved
- 2-3 cloves garlic
- a handful fresh coriander (or parsley)
 
Add olive oil or ghee and cook at 100C, 2 minutes, speed 1:
- 30g olive oil or ghee
 
Add curry powder and lemon juice. Cook 100C, 2 minutes, speed 1:
- 2-4 Tbspns curry powder (depending how hot you like it)
- 1 Tbspn lemon
 
Add coconut milk/cream, vege stock paste and frozen peas, and cook 5 minutes, 100C, reverse speed 1:
- 400g coconut cream or milk
- 1 Tbspn vege stock paste
- 150g peas (frozen is fine)
 
Meanwhile, peel eggs and cut into quarters. Arrange on top of quinoa. When curry sauce is ready, pour over the quinoa and eggs, and serve.
 
*     *     *     *     *

Variations: You could easily jazz this up a bit by steaming chicken breast pieces in the Varoma on top while the quinoa is cooking, as well as a bunch of sliced veges. Or you could add in any leftover veges from the night before instead of the frozen peas - I tend to do things like that. If you can't have eggs, just leave them out and use chicken or veges instead. Maybe add a tin of chickpeas with the veges. Play around with it and see what you come up with. Hope you like it! :)
 
*     *     *     *     *

Jumat, 09 November 2012

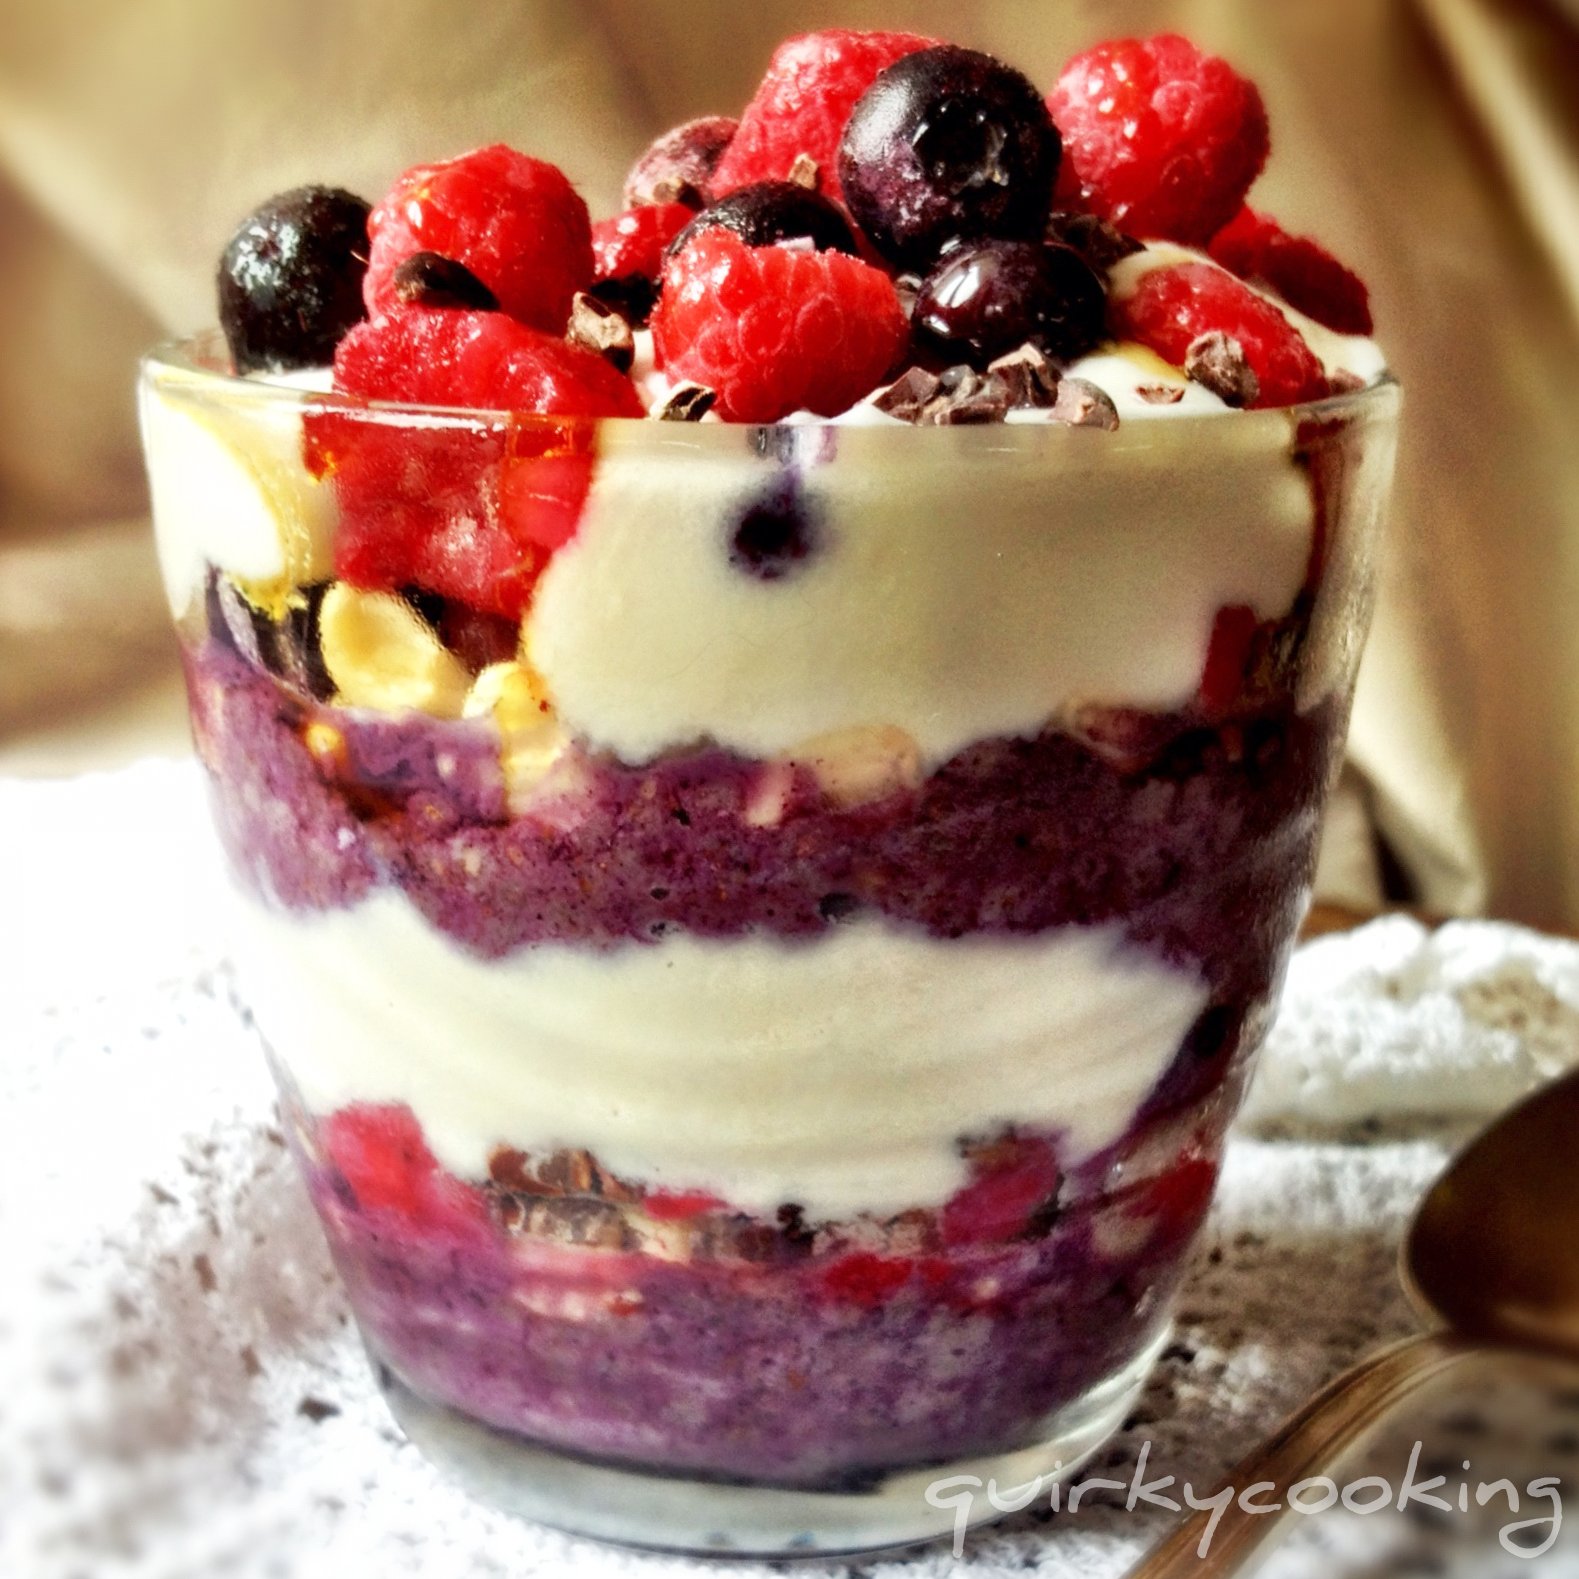
Layered Maqui Chia Pudding


Chia pudding (or porridge) is a staple part of my diet. I eat it for breakfast or morning tea, afternoon tea or supper. Sometimes all four! If I'm rushed, I eat it for lunch too. I'm kind of addicted to it. Here's why:

1. It's delicious. Think berries and cream with a chocolatey-nutty crunch!

2. It's quick and easy. It only takes 5-10 minutes to make my quick version.

3. It makes lots and lasts for a week in the fridge. So I can make up a big batch and have enough for a few days.

4. It's versatile. Every batch I make is slightly different to the last, depending on what I have on hand. (See variations below)

5. It's healthy. Chia has approximately 6 times more calcium than milk, as well as being high in Omega 3 and 6 fatty acids, and other essential minerals. Then there's all the goodness of the Maqui berry powder with it's high level of antioxidants, the coconut cream with it's lauric acid, and the benefits of whatever other superfoods you add, like goji berries and cacao nibs.

6. It's the perfect low GI, natural, 'sweet treat'. It keeps me from getting 'hangry' halfway through the morning or afternoon. {Hangry: 'A state of anger caused by a lack of food.' Know what I mean?} Chia seeds and mesquite powder are both great blood sugar stabilizers. As my mum used to say when she gave us porridge for breakfast, "It'll stick to your ribs!"

7. It travels well. I pop a batch into a jar and take it with me as I dash out the door. I even took some on the aeroplane the other day for my lunch... The guy next to me was looking at me a little strangely as I ate my pudding and drank my green smoothie from a jar, but hey, I'd rather that than the dry white bread sandwich and softdrink he had for lunch!

And if that's not enough, here's Jess the Wellness Warrior's 13 Reasons to Eat Chia Seeds Every Day!


One Layered Maqui Chia Pudding to go...

And just in case that's not enough reasons for you to try chia pudding - it looks pretty! Especially when you layer it.


There's lots of different recipes around for chia puddings and porridges, usually involving at least 40 minutes of soaking time, or soaking overnight. Sarah from 'Homemade, Healthy, Happy' has a delicious one here that I love, but I decided I wanted a quicker version - I'm usually in a last minute rush in the mornings, so 40 minutes seems a bit too long to wait for the soaking time. I find that by warming the pudding gently for a few minutes at 37C, the chia seeds soak up the liquid just as well as when they are soaked, without being 'cooked' and losing their goodness. I also wanted to make one that was kind of fun - which is why I layered it and called it a pudding instead of a porridge. ;-)

I've tried lots of different versions of chia pudding, and pretty much love them all. But this one is how I make it most of the time - with superfood Maqui powder for an antioxidant boost, plus lots of other yummy bits and pieces. My Instagram friends come up with some great combos, and I'm continually being inspired by other people's versions, like these on my Facebook page. To give you some more ideas of possible variations, here's a few others I've seen that look great!

- Coconut Water Chia Porridge (I keep meaning to try this, but I love coconut water so much that I always drink it before the porridge gets made!)

...and if you google 'chia pudding' and 'chia porridge' you'll come up with heaps more! The variations are endless.

{Note: Some people find too much chia can bother their tummy, especially if it's not soaked. If you find my quick version doesn't agree with you, try soaking the chia in the almond milk overnight in the fridge, then continue recipe as below. This is usually only the case for people with gut issues.}


Layered Maqui Chia Pudding 

First make the almond milk (below), or you can use coconut milk or coconut water instead.

1. Weigh almonds into Thermomix bowl and grind on speed 9 for 20 seconds:
- 100g raw almonds

2. Add water and blend on speed 9 for 1 minute:
- 550g filtered water

3. Add following ingredients, and cook at 37C for 5 minutes, speed 1:
- 85g chia seeds
- 1-2 tsp Mesquite powder
- 2 Tbspns Yacon syrup or raw honey
- 1 tsp ground cinnamon (optional)
- pinch of ground nutmeg (optional)
- 1 tsp vanilla bean paste
- a handful of raw cacao nibs
- a handful or two of goji berries and/or sultanas


Maqui berry powder - full of antioxidants!

4. Remove pudding to a dish or large jar to keep in the fridge. (It will be a little runny at first, but I make it like that on purpose because it gets thicker as it sits, and I don't like it too thick.) For each serving, layer the following in a glass or jar in the order given:
- a few Tblspns chia pudding
- a handful of raw cashews or macadamias
- a few blueberries
- a few raspberries
- a couple of blobs of coconut cream
- a drizzle of pure maple syrup

Repeat the layers.


Variations:

- Instead of vanilla bean paste, you can use a whole vanilla bean. Pop it in with the almonds and grind them up, then add water and blend.

- If you don't have Maqui powder or Mesquite powder, that's okay. I like to use them because they add extra goodness and the Maqui makes the chia such a lovely colour, but it will taste fine without. Try stirring in some homemade (sugar free) strawberry jam instead - my friend Emma suggested this, and it's delicious!!

- Try a coconut version: blend up the water and flesh of a young (green) coconut and use that instead of almond milk; leave out the yacon syrup or honey as the coconut water is sweet enough on it's own.

- If you can't have nuts, try coconut flakes instead, or maybe some toasted pepitas.

- Swap the coconut cream for coconut milk yoghurt, and instead of berries try some slices of mango. Drizzle over some passionfruit pulp instead of pure maple syrup.

- Try cherries with cacao nibs and chocolate covered goji berries, topped with coconut flakes. Mmmm....

- Fresh and juicy peaches, nectarines or strawberries are great too, instead of the berries.

- You could use other sweeteners besides Yacon syrup or honey or pure maple syrup - some prefer agave syrup, or coconut nectar, or carob syrup. Even stevia would work in the chia pudding. I would suggest sticking to a liquid sweetener though, as granulated sugars such as Rapadura wouldn't mix in so well.

Let me know what other great variations you come up with!


Now, for those of you who would like to try some Yacon Syrup, Mesquite Powder or Agave Syrup, Loving Earth has kindly given me some to give away. So leave a comment below saying what variation of Chia Pudding you'd like to try, and next Saturday (17th November) I'll pick 3 comments via Random.org and the winners will receive one of the above products to try! One comment each please, and let me know which product you'd prefer to win in your comment, so I can put you in the right prize draw. Woo hoo, thank you Loving Earth!!

{To find out more about all these interesting ingredients I use, click on the links and they will take you to pages with more info.}


Sabtu, 13 Oktober 2012

Raw Superfood Fudge


Warning: this fudge disappears quickly!
(naturally sweetened with dates & stevia; gluten free, grain free, dairy free, egg free)

Here's a chocolate treat that you can eat guilt-free, which will help to control those chocolate cravings without overloading your body with sugar. It is not only raw and naturally sweetened, but full of antioxidants, vitamin C, protein, fibre, magnesium, immune system boosters and other nutrients to nourish your body. The raw cacao is a great pick-me-up, and I often find myself reaching for it after lunch when I need an energy boost. I tell my kids this is one sweet treat they can eat as much as they like of, which makes them pretty happy! (Although it's quite rich, so they never eat more than two or three pieces at a time.)

To maximise the goodness of this fudge, I've used two of Loving Earth's superfood powders. Rainbow Superfood Blend is quickly becoming my favourite superfood powder, because instead of opening lots of packets and jars and combining powders, I can just grab this one jar and scoop out a spoonful of maqui berry, acai, AFA, gubinge (Kakadu plum) and camu camu powders. It just simplifies things. I also add some extra maqui berry powder as this is a 'fruity' fudge! It gives it an extra depth of flavour, plus even more goodness. (If you're not sure what any of those are and why they're so good for you, click on the links to see an explanation, as well as ideas of how to use them.)

I also like to add dried, organic cherries to my fudge, or a couple of handfuls of goji berries. If you don't have any, you can either leave them out, or add some sultanas instead.

 
WIN a jar of Loving Earth's Maqui or Rainbow Superfood Powders!

Okay, so here's the exciting news... You have the chance to WIN one of the above superfood powders from Loving Earth!! They have kindly sent me some goodies to give away, so for your chance to win one of these amazing jars of goodness, just leave a comment on this post saying what you would make with it if you had some to try. There will be two winners drawn randomly in one weeks' time, on Saturday 20th October, 2012, at 5pm. The first winner will receive a 150g jar of Rainbow Superfood Blend (worth $44.90), and the second winner will receive a jar of Maqui Powder (worth $39.90). (This competition is only open to Australian residents - sorry to my overseas followers, but postage is horrendous these days! If you are desperate to try it, you can order online from Loving Earth.)

Okay, so here's my recipe for Raw Superfood Fudge ~ try it out, and don't forget to leave a comment! Enjoy :)

1. Grind up in your Thermomix on speed 9 for 30 seconds:
- 1 whole vanilla bean, snipped in a couple of pieces (no need to scrape out seeds)
- 100g raw cacao nibs

2. Add and grind on speed 9 for 10 seconds:
- 100g raw walnuts
- 100g raw cashews


[Note: nuts that are high in enzyme inhibitors (like walnuts) are easier to digest if they have been 'activated' - soaked, rinsed, then dehydrated. You can do this yourself, or you can buy them activated here. You can use regular raw nuts if that's all you have. Any combination of nuts will work - I like cashews & walnuts as they are oily, so they make a 'creamier' fudge.]

3. Add and process on speed 9 for a minute, or until fudge is smooth and begins to form a ball (as in picture below):
- 100g raw dates
- 80g coconut butter
(make your own from dried coconut)
- 60g coconut oil (sometimes called coconut butter)
- 1 heaped tsp Rainbow Superfood Blend
- 1 heaped tsp Maqui Berry Powder
- 10 drops vanilla stevia or a pinch of green stevia powder (optional)
- pinch of Himalayan salt


4. Mix in on speed 3 for a few seconds:
- a handful of dried sour cherries or goji berries

5. Press mixture into a square or small rectangular dish (I use a Pyrex glass dish), and pop into the fridge to set. If you like, you can make the mixture into balls instead of squares. Keep refrigerated or it will soften and crumble.


(This is not a paid post, although Loving Earth did send me some samples and giveaways. But even if they hadn't, I would still link to them because I LOVE their products!! I think I should maybe just move into their warehouse...)

Minggu, 07 Oktober 2012

Superfood Trail Mix Clusters (Nut Free)


Superfood Trail Mix Clusters
 
Well, it's back to school tomorrow for the kids here in Queensland, and we've been tossing around lots of healthy lunch box ideas here on my Facebook page. While we were chatting, I remembered I'd been meaning to come up with a trail mix my kids would like... they're not too keen on the usual nuts and sultanas ones. So I dashed off to the kitchen and emptied half my pantry onto the bench, had a bit of a brainstorm, and this is what I came up with. Instead of a traditional trail mix, I made the mixture into little clusters, as I think it's easier to eat this way.

I used superfood berries and dried cherries instead of sultanas; seeds and shredded coconut instead of nuts; and Cacao Crunch instead of chocolate chips. (Cacao Crunch is cacao nibs rolled in a liquified form of the roasted nibs, then rolled in panela (Rapadura) - so yum! Very lightly sweet, but chocolatey and full of antioxidants!)


Cacao Crunch
For a great energy boost, munch on a small handful of these... but beware, don't eat them before bed, or you won't sleep! (I know this by experience...lol)


If you don't have the berries and cherries, just substitute with whatever you have - dried apricots or peaches chopped in bits, sultanas, currants, etc. I would suggest you try the goji berries and goldenberries, though, if you possibly can, as they're lovely and tart and SO good for you! (And again, very high in antioxidants!)

Here's some of the ingredients I used in my trail mix clusters...
 
 
Goji Berries, Cacao Crunch, Goldenberries, Organic Dried Cherries, Coconut Butter (homemade from shredded coconut) and Organic Shredded Coconut (all available from most health food stores or online)


Goldenberries, goji berries and Cacao Crunch - yum!


Superfood Trail Mix Clusters (Nut Free)

1. First, make a batch of coconut butter and remove to a jar or bowl. Or if you like, you could use bought coconut butter. (You'll need 150g.) I don't mean coconut oil, I mean dried coconut which is ground up to make a paste (like a nut butter) which sets hard as it cools. (Keep coconut butter in a jar in the cupboard - it gets too hard in the fridge.)

I used coconut butter I already had in a jar, and just chopped it up a bit with a knife so it was all crumbly. (See photo below)


2. Weigh coconut butter into Thermomix bowl:
- 150g coconut butter
 
3. Add remaining ingredients to Thermomix and mix on reverse, speed 3, for about 10 seconds or until well combined:
- 15g shredded dried organic coconut (or coconut flakes), unsweetened
- 35g goji berries
- 50g Cacao Crunch
- 40g Goldenberries
- 60g pepitas
- 30g sunflower seeds
- 60g dried organic cherries
- 50g coconut oil (extra virgin)
- 10 to 15 drops vanilla liquid stevia (or plain), or to taste
 
Mixture should be damp, and sticking together, like this:


3. Pour mixture out onto a tray and flatten a bit with your hands. Pop it into the freezer for a bit, until coconut oil solidifies.
 
4. Break apart gently into little clusters. Place handfuls into little ziploc bags and keep them in the freezer to put into lunchboxes, or to grab as you run out the door for an on-the-go snack.


Note: If the weather is hot and there's no cold pack in the lunch box, these clusters may fall apart. Don't worry, they can just be eaten crumbly like a 'normal' trail mix, too. :)
 
 
Variation:
 
Instead of letting mixture set on a tray in the freezer, press mixture firmly into chocolate molds, then freeze for a while. Pop them out of molds and keep in a bag in the freezer.


Enjoy!

Kamis, 04 Oktober 2012

Steamed Chocolate Raspberry Mudcakes with Raspberry Coconut Cream


Here's a deliciously simple recipe you can whip up at short notice... I made it tonight on the spur of the moment, and thought I'd better share! (Especially since there's going to be a riot on my Facebook page if I don't!!) You can make them either with gluten free flour, or spelt flour. They are dairy free and vegan and nut free, so that should keep quite a few of you happy! :D

The mudcake recipe is one I posted ages ago, with a recipe for orange sabayon. It's here: Steamed Chocolate Mudcakes with Orange Sabayon.


For this raspberry version, just sprinkle some raspberries in the bottom of your silicon cupcake molds, pour the chocolate batter over (only to just over half way), and steam for 20 minutes at Varoma temp, speed 2.

While cakes are cooking, freeze a tin of coconut cream, unopened, without shaking it up. This is just so the thick cream rises to the top and gets firm - it doesn't need to be frozen. You'll also want to pick out enough whole raspberries for on top of the cakes, and set them aside.

When cakes are done, let them cool while you make the raspberry cream.

Raspberry Coconut Cream

Weigh into the Thermomix bowl and mix on speed 5 for 10 seconds:
- 80g of frozen raspberries

Add:
30g pure maple syrup
- 1/2 a teaspoon of vanilla bean paste (or vanilla extract)
- 150g thick coconut cream (scooped off the top of the tin of cream)

Mix on speed 5 until just combined. It's nice to have it a bit swirly, not just completely pink.

Top the cooled cakes with raspberry coconut cream, a raspberry, and some grated dark chocolate. (I used a 65% cocoa chocolate which is dairy free.)

Recipe makes 14-16 cakes.

 
If you love these little teacup and saucer silicon molds, you can buy them here!